Tesla Model S: To Fasten a Belt
1. Ensure correct positioning of the seat (see Correct Driving Position).
2. Draw the belt out smoothly, ensuring the belt lays flat across the pelvis, chest and mid-point of your collar bone, between the neck and shoulder.
3. Insert the latch plate into the buckle and press together until you hear a click indicating it is locked in place.
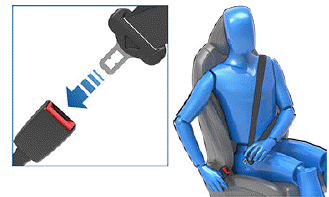
4. Pull the belt to check that it is securely fastened.
5. Pull the diagonal part of the belt toward the reel to remove excess slack.
To Release a Belt
Hold the belt near the buckle to prevent the belt from retracting too quickly, then press the button on the buckle. The belt retracts automatically. Ensure there is no obstruction that prevents the belt from fully retracting. The belt should not hang loose. If a seat belt does not fully retract, contact Tesla.
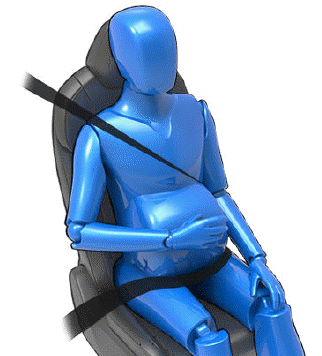
Wearing Seat Belts When Pregnant
Do not put the lap or shoulder sections of the seat belt over the abdominal area. Wear the lap section of the belt as low as possible across the hips, not the waist. Position the shoulder portion of the belt between the breasts and to the side of the abdomen. Consult your doctor for specific guidance.
WARNING: Never place anything between you and the seat belt to cushion the impact in the event of a collision.
READ NEXT:
 Seat Belt Pre-tensioners
The front seat belts are equipped with pre‑tensioners
that work in conjunction with the airbags in a severe
frontal collision. The pre‑tensioners automatically retract
both the seat belt anchor
Seat Belt Warnings
WARNING: Seat belts should be worn by all
occupants at all times, even if driving for a very
short distance. Failure to do so increases the risk
of injury or death if a collision occurs.
WAR
SEE MORE:
Slave Charger - LH - 1st Generation (Remove and Replace)
Note: This procedure describes how to remove and install
the 1st generation slave charger. If the vehicle is equipped with a
2nd generation slave charger, refer to procedure 44102102 (refer to
procedure).
Warning: Only technicians who have been trained in High
Voltage Awareness
Stopping Charging
Stop charging at any time by disconnecting the charge
cable or touching Stop Charging on the touchscreen.
NOTE: To prevent unauthorized unplugging of the
charge cable, the charge cable latch remains locked and
Model S must be unlocked or able to recognize your key
before you can disconnect the c
