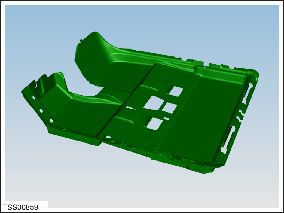
Tesla Model S: Carpet - Interior Complete (Remove and Replace)
Tesla Model S (2012-2026) Service Manual / Interior trim / Carpet - Interior Complete (Remove and Replace)
Removal
- Remove driver seat (refer to procedure)
- Remove passenger seat.
- Remove driver footrest (refer to procedure)
- Remove LH sill panel trim (refer to procedure)
- Remove RH sill panel trim.
- Remove rear seat cushion (refer to procedure)
- Loosen bolts (x2) securing front edge of rear cushion seat base frame and slide carpet out from under it (torque 26 Nm).
- Remove LH rear sill panel trim (refer to procedure)
- Remove RH rear sill panel trim.
- Remove LH lower 'B' post trim (refer to procedure)
- Remove RH lower 'B' post trim.
- Remove center console assembly (refer to procedure)
- Remove LH footwell cover (refer to procedure)
- Remove RH footwell cover (refer to procedure)
- Release and reposition center console assembly harness.
- Release carpet from around both front footwell areas.
- Release carpet from along LH and RH rocker areas.
- Release carpet from around both rear footwell areas.
- With assistance, remove carpet from vehicle.
Caution: Take care not to damage component(s).
Installation procedure is the reverse of removal.
READ NEXT:
 HV Battery Assembly (Remove and Install)
Warning: Only technicians who have been trained in High
Voltage Awareness are permitted to perform this procedure. Proper
personal protective equipment (PPE) and insulating HV gloves with a
HV Battery Assembly (Remove and Replace)
Warning: Only technicians who have been trained in High
Voltage Awareness are permitted to perform this procedure. Proper
personal protective equipment (PPE) and insulating HV gloves with a
SEE MORE:
Trim - Rear Trunk - Side - LH (Remove and Replace)
Removal
Remove the 'C' post rear trim (refer to procedure).
Remove the trunk sill panel.
Remove the trunk side garnish trim.
Remove the trunk floor tri
Lights
Control interior and exterior lights. See Lights.
NOTE: You can also control the exterior headlights by
touching the high beam headlights button on the left
side of the steering yoke and then choosing an option
using the touchscreen. See High Beam Headlights.
Display
Appearance: Customize
© 2019-2026 Copyright www.tesms.org
