Tesla Model S: Exterior/Interior Overview
Tesla Model S (2012-2026) Owner's Manual / Overview / Exterior/Interior Overview
Exterior Overview
NOTE: Depending on market region, vehicle configuration, and options purchased, your vehicle may look slightly different than described.
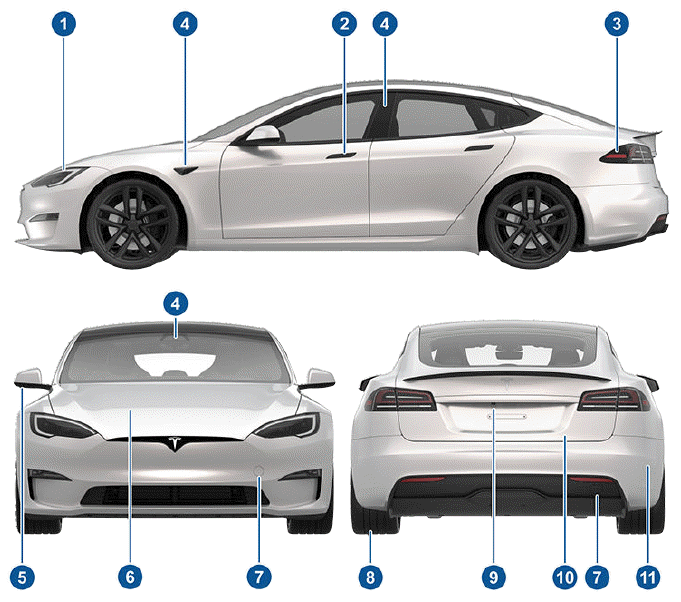
- Exterior lights
- Door handles
- Charge port
- Autopilot cameras
- Exterior mirrors
- Hood/Front trunk
- Front/rear tow eye cover
- Wheels and tires
- Rear view camera
- Rear trunk/liftgate
- Ultrasonic sensors
Interior Overview
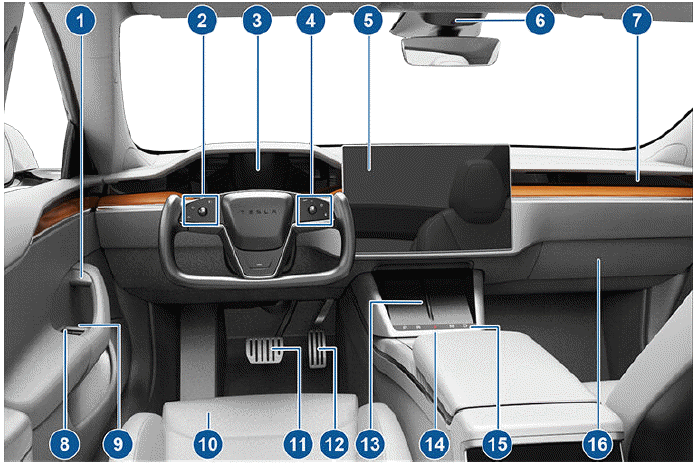
- Interior door handles
- Left steering yoke buttons
- Left Scroll Button
- High Beam Headlights
- Turn Signals
- Instrument panel
- Right steering yoke buttons
- Right Scroll button to control Autopilot features
- Horn
- Wipers
- Voice Commands
- Touchscreen
- Camera
- Cabin climate control
- Power window switches
- Manual door release
- Seats
- Brake pedal
- Accelerator pedal
- Wireless phone chargers
- Hazard warning lights
- Secondary drive mode selector
- Glovebox
Interior Overview
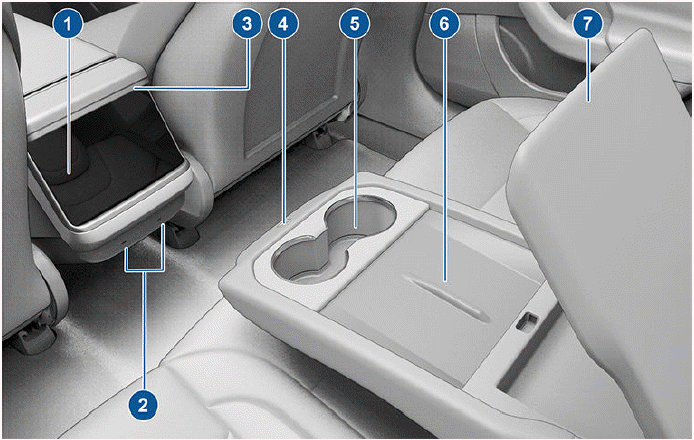
- Rear touchscreen
- USB ports
- Adjustable climate control vents
- Console release button
- Cup holders
- Wireless phone chargers
- Rear armrest
READ NEXT:
 Touchscreen Overview
In addition to the instrument panel, Model S is equipped with a front and
rear touchscreen.
NOTE: Throughout this Owner's Manual, the front touchscreen is
referred to as the "touchscreen" whereas th
SEE MORE:
Low voltage battery service is required
Schedule service - Vehicle may not restart
The low voltage battery cannot provide the electrical support necessary to
drive or continue driving.
If this alert is present while you are driving, your vehicle needs to come to a
stop as soon as possible. Pull over safely
at your earliest opportunity
Adjusting Exterior Mirrors
Adjust the exterior mirrors by touching Controls >
Mirrors. Press the left scroll button on the steering yoke
to choose whether you are adjusting the Left or Right
mirror. Then use the left scroll button as follows to adjust
the selected mirror to its desired position:
To move the mirror up
© 2019-2026 Copyright www.tesms.org
