Tesla Model S: Gearbox Fluid - Large Rear Drive Unit (Remove and Replace)
Tesla Model S (2012-2026) Service Manual / Rear Drive Unit / Gearbox Fluid - Large Rear Drive Unit (Remove and Replace)
Warning: If the vehicle has air suspension, activate "Jack" mode on the touchscreen before raising and supporting the vehicle.
Drain & Refill
- Raise and support the vehicle (refer to procedure). Warning: Do not work on an incorrectly supported vehicle.
- Remove the mid aero shield (refer to procedure).
Warning: Be careful when draining the fluid; the fluid can be very hot.
- Position a container to collect the fluid.
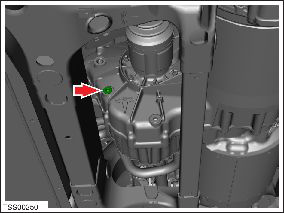
- Clean the area around the filler plug.
- Remove the filler plug.
- Remove the drain plug and allow the liquid to drain into the
container.
Note: Allow the fluid to drain completely before continuing this procedure.
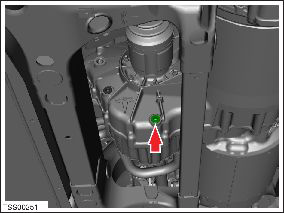
- Clean and install the drain plug (torque 28 Nm).
- Fill the drive unit with the correct amount of proper fluid:
- Use the fluid specified in General Information > Fluids and Capacities > Fluids .
- Use the amount specified in General Information > Fluids and Capacities > Fluid Capacities .
- Install the filler plug (torque 28 Nm).
- Install the mid aero shield.
- Lower the vehicle.
READ NEXT:
 Gearbox Fluid - Small Rear Drive Unit (Remove and Replace)
Warning: If the vehicle has air suspension, activate "Jack"
mode on the touchscreen before raising and supporting the vehicle.
Drain & Refill
Position the vehicle in preparation for
Oil Seal - Differential to Driveshaft Assembly - LH (Remove and Replace)
Special tools required for this procedure:
Supplier
Part Number
Description
Tesla
1051509-
Driveshaft Assembly - LH (Remove and Replace)
Warning: If the vehicle has air suspension, activate "Jack"
mode on the touchscreen before raising and supporting the vehicle.
Special tool(s) required for this procedure:
Suppl
SEE MORE:
Lamp - Fog - Front - LH (Remove and Replace)
Removal
Remove the front fascia (refer to procedure).
Release the clips (x4) that secure the fascia harness to the fog
lamp assembly.
Disconnect the fog lamp harness connector.
Remove the screws (x3) and bolt th
Module - HVAC Controller - RCCM (Remove and Replace)
Removal
Remove the IP carrier (refer to procedure).
Disconnect the HVAC harness connector from the Remote Climate
Control Module (RCCM).
Remove the screws (x4) that secure the RCCM to the HVAC casing.
Remove the
© 2019-2026 Copyright www.tesms.org
