Tesla Model S: Replacing Wiper Blades
For optimum performance, replace the wiper blades at least once a year. Replacement blades must meet the following criteria:
- The blade on the driver's side must be 26 inches (650 mm) long and 20 inches (500 mm) long for the blade on the passenger's side.
- Ensure the connector on the replacement blade is the same as the original blade. Different connectors may prevent the replacement blade from connecting to the wiper arm on the vehicle.
You can purchase replacement wiper blades on http:// www.tesla.com.
NOTE: Only install replacement blades that are identical to the original blades. Using inappropriate blades can damage the wiper system and windshield.
To replace the wiper blades:
1. Shift into Park and turn off the wipers.
2. Touch Controls > Service > Wiper Service Mode > ON to move the wipers to the service position.
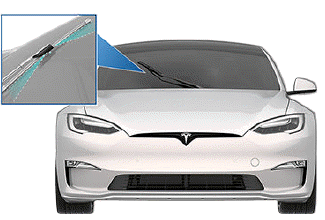
3. Lift the wiper arm a short distance away from the windshield, just far enough to access the wiper blade.
CAUTION: Wiper blades do not lock into a lifted position. Do not lift a wiper arm beyond its intended position.
4. Place a towel between the wiper arm and windshield to avoid scratching or cracking the windshield.
5. Hold the wiper arm and press the locking tab while sliding the blade down the arm.
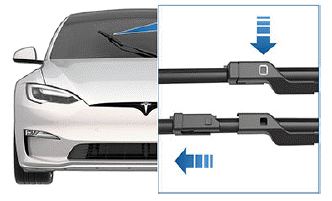
6. Align the new wiper blade on the wiper arm and slide it toward the end of the wiper arm until it locks into place.
7. Turn Wiper Service Mode off to return the wipers to their normal position.
Cleaning Washer Jets
The position of the windshield washers is set at the factory and should never need adjusting.
If a windshield washer becomes blocked, use a thin strand of wire to clear any blockages from the nozzles.
WARNING: Do not operate the washers while cleaning Model S. Windshield washer fluid can irritate eyes and skin. Read and observe the washer fluid manufacturer's instructions.
READ NEXT:
 Removing the Maintenance Panel
To check fluid levels, remove the maintenance panel:
1. Open the hood.
2. Pull the maintenance panel upward to release the
clips that hold it in place.
CAUTION: The maintenance panel protects the
Checking Brake Fluid
WARNING: Contact Tesla immediately if you notice
increased movement of the brake pedal or a
significant loss of brake fluid. Driving under these
conditions can result in extended stopping
di
SEE MORE:
Adjusting the Front Seats
Move seat forward/backward and adjust the seat's
height and tilt angle up/down.
Adjust backrest.
Adjust lumbar support.
WARNING: Before adjusting a front seat, check
that the area around the seat is free of obstacles
(people and objects).
WARNING: Do not adjust seats while driving.
Module - Air Suspension - ECU (Remove and Replace)
Warning: If the 12V power supply is disconnected, do
not attempt to open any doors with door glass in closed position.
Failure to follow this instruction could result in door glass
shatter.
Note: Before disconnecting the 12V power supply,
ensure that the driver's door window
