Tesla Model S: Topping Up Windshield Washer Fluid
The only reservoir into which you can add fluid is the windshield washer fluid reservoir, which is located behind the front trunk. When the level is low, a message displays on the instrument panel.
To top up the washer fluid:
1. Open the hood.
2. Clean around the filler cap before opening it to prevent dirt from entering the reservoir.
3. Open the filler cap.
4. While avoiding spilling, fill the reservoir until the fluid level is visible just below the filler neck.
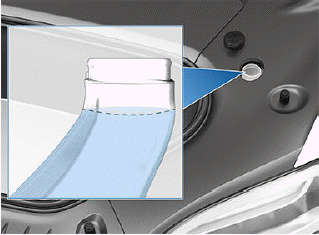
5. Wipe up any spills immediately and wash the affected area with water.
6. Reinstall the filler cap.
NOTE: Some national or local regulations restrict the use of Volatile Organic Compounds (VOCs). VOCs are commonly used as antifreeze in washer fluid. Use a washer fluid with limited VOC content only if it provides adequate freeze resistance for all climates in which you drive Model S.
CAUTION: Do not add formulated washer fluids that contain water repellent or bug wash. These fluids can cause streaking, smearing, and squeaking or other noises.
WARNING: In temperatures below 40º F (4º C), use a washer fluid with antifreeze. In cold weather, using a washer fluid without antifreeze can impair visibility through the windshield.
WARNING: Windshield washer fluid can irritate eyes and skin. Read and observe the instructions provided by the washer fluid manufacturer.
READ NEXT:
 Jacking and Lifting
Jacking Procedure
Follow the steps below to lift Model S. Ensure that any
non-Tesla repair facility is aware of these lifting points.
1. Position Model S centrally between the lift posts.
2. If your
Parts, Accessories, and
Modifications
Use only genuine Tesla parts and accessories. Tesla
performs rigorous testing on parts to ensure their
suitability, safety, and reliability. Purchase these parts
from Tesla, where they are professi
SEE MORE:
Striker - Door - Front - LH (Remove and Replace)
Removal
Open door.
Remove countersunk screws (x2) securing striker plate to 'B'
pillar (torque 22 Nm).
Note: Note installed position of components before
removal.
Remove door striker.
Mount - Front Drive Unit - LH (Remove and Replace) - Removal
Warning: If the 12V power supply is disconnected, do
not attempt to open any doors with door glass in closed position.
Failure to follow this instruction could result in door glass
shatter.
Note: Before disconnecting the 12V power supply,
ensure that the driver's door window
