Tesla Model S: Shield - Dust - Brake - Front - 2nd Generation (Retrofit)
Tesla Model S (2012-2026) Service Manual / Brakes / Shield - Dust - Brake - Front - 2nd Generation (Retrofit)
Procedure
- Remove the front hub assembly (refer to procedure).
-
Install the dust shield using the 2 existing
holes in the knuckle (torque 8 Nm).
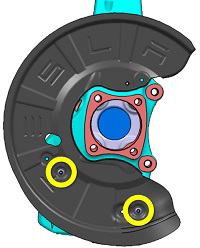
-
Use a punch to mark the location of the 3rd
bolt hole onto the knuckle.
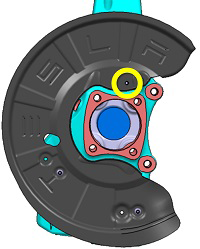
- Remove the dust shield.
- Use a 5 mm drill bit to drill a hole through the knuckle using the location that was marked in step 3.
- Use an M6x1 tap to cut threads into the hole that was created in the previous step. Caution: Ensure that the tap is straight and perpendicular to the hole while cutting the threads. Note: If necessary, use cutting oil to lubricate the tap.
- Reinstall the dust shield and install the bolts (x3) that secure it to the knuckle (torque 8 Nm).
- Perform steps 1-7 on the other side of the vehicle.
READ NEXT:
 Master Cylinder and Reservoir Assembly (Remove and Install)
Note: This procedure
applies to vehicles with the vacuum brake booster only. If the
vehicle has the electromechanical brake booster assembly, the
master cylinder and reservoir assembly
Master Cylinder (Remove and Replace)
Note: This procedure
applies to vehicles with the vacuum brake booster only. If the
vehicle has the electromechanical brake booster assembly, the
master cylinder is part of the brake bo
Brake Hose - Flexible - Front - LH (Remove and Replace)
Warning: If the vehicle
has air suspension, activate "Jack" mode on the touchscreen before
raising and supporting the vehicle.
Removal
Remove the front LH wheel
(refer
SEE MORE:
Frame - Seat Base - 2nd Row Cushion (Remove and Replace)
Removal
Remove the seat cushion (refer to procedure).
Remove the LH rear seat back rest assembly (refer to procedure).
Remove the RH rear seat back rest assembly (refer to procedure).
If the vehicle is equipped with the Subzero Weather package,
disconnect the 2 seat
Lamp - Reflex - Rear - LH (Remove and Replace)
Removal
Remove rear fascia assembly for access (refer to procedure)
Release clips (x2) securing reflex lamp to rear fascia.
Remove reflex lamp.
Installation
Installation procedure is the reverse of
© 2019-2026 Copyright www.tesms.org
