Tesla Model S: Air Spring Module - Rear - LH (Remove and Replace)
Tesla Model S (2012-2026) Service Manual / Suspension / Air Spring Module - Rear - LH (Remove and Replace)
Warning: If the vehicle has air suspension, activate "Jack" mode on the touchscreen before raising and supporting the vehicle. Removal
- Raise and support the vehicle (refer to procedure). Warning: Do not work on an incorrectly supported vehicle.
- Depressurize the air spring module (refer to procedure).
- Remove the mid aero shield (refer to procedure).
- Remove the LH rear wheel arch liner (refer to procedure).
- Remove the parking brake caliper (refer to procedure).
- Support the rear suspension with a stand.
- Remove the bolt that secures the upper link to the knuckle (torque 140 Nm).
- Remove the bolt that secures the outer toe link to the knuckle
(torque 130 Nm).
- Release the bushing from the knuckle, lifting the arm for
access.

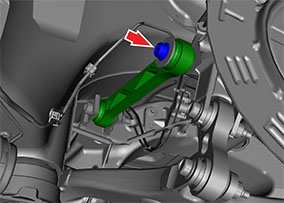
- Remove the nut and bolt that secure the air spring module to the
knuckle (torque 140 Nm). Release the air spring module from the
suspension knuckle.
- Release the clips (x3) that secure the air supply line to the
body.
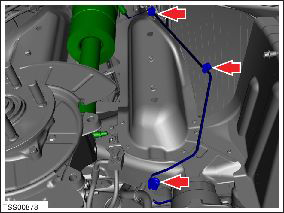
- Remove the nuts (x3) that secure the air spring module to the body (red arrows, torque 40 Nm).
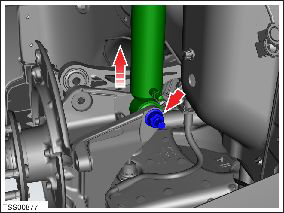
- Carefully lower the air spring module until the air line
connector is accessible. Loosen the nut and disconnect the air line
(yellow arrow, torque 5 Nm).
Caution: Thoroughly clean the air pressure line ports prior to disconnection. Failure to maintain cleanliness will adversely affect system performance.

- Remove the air spring module from the vehicle. Caution: Take care not to damage component(s).
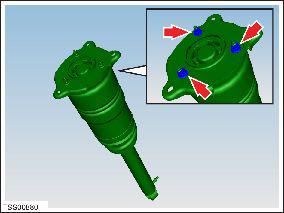
- Remove the nuts (x3) that secure the adapter plate to the air
spring module (torque 40 Nm).
- Installation procedure is the reverse of removal, except for the following: Caution: Replace all nylon-insert locknuts. Caution: Ensure that the bolt that secures the spring assembly to the knuckle is inserted towards the rear of the vehicle; the head of the bolt faces the front of the vehicle and the nut is tightened at the rear. Note: Clean the affected areas before installation. Caution: Only fully tighten suspension nuts and bolts when the vehicle is on a 4-post lift and the suspension is in the ride height position.
- Prior to attaching the air pressure line to the air spring module, ensure that all interfaces are clean to prevent possible leaks.
- Pressurize the air spring module (refer to procedure).
READ NEXT:
 Air Suspension - Pressurize/Depressurize - One Air Spring
Depressurize
Connect a laptop with Toolbox to the vehicle.
Press the brake pedal to turn on the drive rails.
Leave the driver's door open to keep the drive rails on.
In Toolbox, sele
Air Suspension - Depressurize - Full System
Depressurize
Connect a laptop with Toolbox to the vehicle.
Press the brake pedal to turn on the drive rails.
Leave the driver's door open to keep the drive rails on.
Use the Toolbox
Air Suspension - Pressurize - Full System
Add Nitrogen to the Air Reservoir System
Warning: Wear eye protection while performing this
procedure.
Caution: Tesla recommends using a nitrogen refill kit to
refill the air sus
SEE MORE:
SD Card - Media Control Unit (Remove and Replace)
Note: This procedure only applies to MCU/touch screens
that are revision E or later.
Removal
Remove the MCU/touch screen (refer to procedure).
Working from the top of the MCU/touch screen, carefully use a
plastic trim tool to press the SD card retaining tab away from th
Seat Belt Assembly - 2nd Row - Center (Remove and Replace)
Removal
Remove the 2nd row seat cushion (refer to procedure)
Carefully release pegs (x2) securing seatbelt trim to seat back.
Release clips (x18) securing seat back cover. Remove for access
to middle seat belt.
© 2019-2026 Copyright www.tesms.org
