Tesla Model S: Air Suspension - Pressurize - Full System
Add Nitrogen to the Air Reservoir System
Warning: Wear eye protection while performing this procedure.
Caution: Tesla recommends using a nitrogen refill kit to refill the air suspension reservoir. Do not use shop air, which might contain contaminants that could damage the air suspension system.
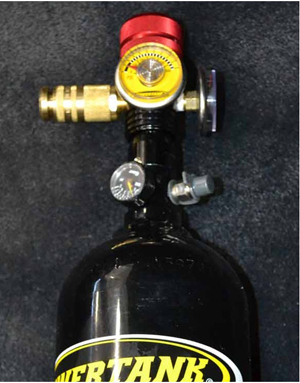
Nitrogen Refill Kit
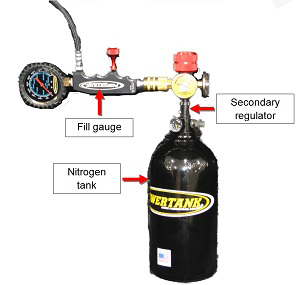
- Remove the center underhood apron (refer to procedure).
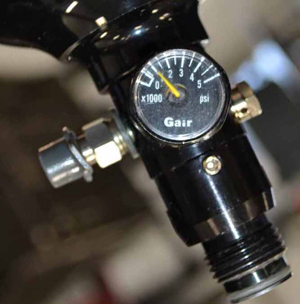
- Verify that the gauge on the nitrogen tank reads between 1000
and 3000 psi.
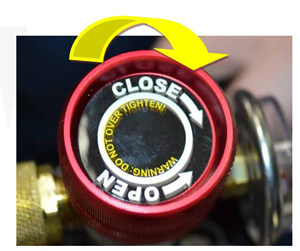
- Turn the red ring on the secondary regulator all the way
clockwise. This ensures that the regulator is fully closed.
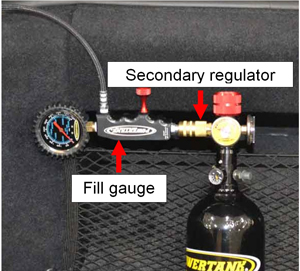
- Attach the secondary regulator to the nitrogen tank.
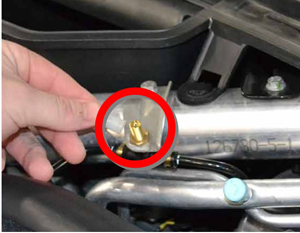
- Remove the safety cap from the vehicle's air suspension
reservoir fill point.
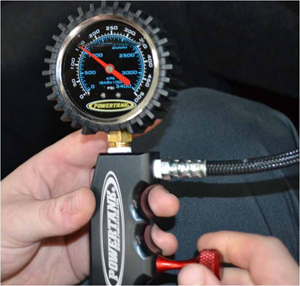
- Tighten the nut that secures the fill gauge to the reservoir
fill point.
Caution: Ensure that the upper knob is closed by turning it all the way counterclockwise.

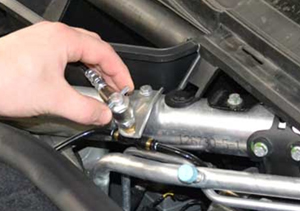
- Attach the fill gauge to the secondary regulator.
- Slowly turn the red ring on the secondary regulator counterclockwise. This allows nitrogen to fill the secondary regulator.
- Check the gauge on the secondary regulator to verify that it has
pressure.
- Open the upper knob on the fill gauge, which is secured to the
reservoir fill point.
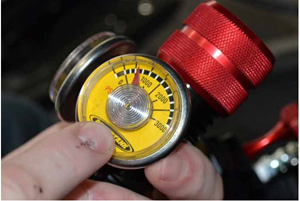
- Slowly turn the red knob on the fill gauge to allow nitrogen
into the air suspension reservoir. Adjust the knob until the fill
gauge reads 150 psi.
- Turn the red ring on the secondary regulator all the way clockwise to close it.
- Turn the red ring on the fill gauge all the way clockwise to close it.
READ NEXT:
 Compressor - Air Suspension (Remove and Replace)
Warning: If the vehicle has air suspension, activate "Jack"
mode on the touchscreen before raising and supporting the vehicle.
Removal
Raise and support the vehicle (refer to procedu
Sensor - Ambient Air Temperature - Compressor (Remove and Replace)
Removal
Remove underhood storage unit for access (refer to procedure)
Position hoses aside for access.
Remove screw securing compressor ambient air temperature sensor
(torque
Solenoid - Air Suspension (Remove and Replace)
Removal
Raise and support the vehicle (refer to procedure).
Depressurize the air suspension (refer to procedure).
Access the solenoid.
For vehicles manufactured be
SEE MORE:
Collision Avoidance Assist
The following collision avoidance features are designed
to increase the safety of you and your passengers:
Forward Collision Warning - provides visual and
audible warnings in situations when Model S detects
that there is a high risk of a frontal collision.
Automatic Emergency Braking - autom
Wheel Sensor - TPMS (Remove and Replace) - Installation
Installation
Clean and inspect the wheel and valve hole.
Remove any dirt, burrs, or swarf.
Install the valve retaining screw to the wheel
sensor.
Note: Ensure that
the square faces are parallel with the slot in the sensor.
