Tesla Model S: Bleed Procedure - One Caliper (Remove and Replace)
Warning: If the 12V power supply is disconnected, do not attempt to open any doors with door glass in closed position. Failure to follow this instruction could result in door glass shatter.
Note: Before disconnecting the 12V power supply, ensure that the driver's door window is fully open. Failure to follow this instruction could result in vehicle lockout.
Bleed
Note: The bleed procedure requires bleeding through the outboard bleed nipple of each caliper, bleeding through the inboard bleed nipple, then bleeding through the outboard bleed nipple again.
Note: A pressure bleeder is required to properly bleed the brake system. Do not use a vacuum bleeder.
- Remove the rear underhood apron (refer to procedure).
-
Disconnect 12V power.
- Rear wheel drive (RWD): Refer to procedure.
- Dual Motor: Refer to procedure.
- Remove the road wheel (refer to procedure).
- Clean the area surrounding the brake fluid reservoir cap, then remove the cap. Note: Place suitable absorbent material around the affected area to absorb any possible fluid spillage. Caution: If brake fluid is spilled on a painted surface, wash off immediately with clean water.
- If the brake fluid is excessively dirty, use a syringe to remove the brake fluid from the reservoir.
- Top off the brake fluid reservoir. Warning: Use the brake fluid specified in this manual only (General Information > Fluids and Capacities > Fluids). Warning: Use only new brake fluid from a sealed container. Do not reuse brake fluid.
- Install the pressure bleeder on the reservoir. Fill the pressure bleeder with sufficient brake fluid to replace all fluid used during the bleed procedure. Warning: Use the brake fluid specified in this manual only (General Information > Fluids and Capacities > Fluids). Warning: Use only new brake fluid from a sealed container. Do not reuse brake fluid. Note: This procedure requires a significant amount of fluid. Make sure that the pressure bleeder reservoir is adequately filled before continuing.
- Set the pressure bleeder to 30 PSI (2.07 bar).
-
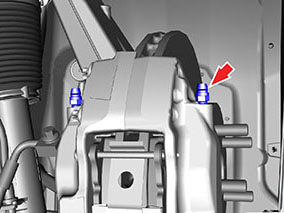
Pressure bleed the affected caliper.
-
Attach a brake bleed container to the
outboard bleed nipple on the caliper.
Note: Place suitable absorbent material around the affected area to absorb any possible fluid spillage.
- Loosen the bleed nipple one quarter turn counterclockwise.
- Tighten the bleed nipple once a flow of clean, air-free fluid is purged into the container (torque 17-20 Nm)
- Disconnect the bleed container and clean any brake fluid from the caliper.
Caution: If brake fluid is spilled on a painted surface, wash off immediately with clean water.
-
Attach a brake bleed container to the
outboard bleed nipple on the caliper.
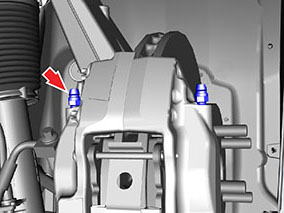
-
Repeat step 9, using the inboard bleed nipple.
-
Repeat step 9, using the outboard bleed nipple
a second time.
- Leave the pressure bleeder attached to the reservoir.
-
Manually bleed the affected caliper.
-
Attach a brake bleed container to the
outboard bleed nipple on the caliper.
Note: Place suitable absorbent material around the affected area to absorb any possible fluid spillage.
- Have an assistant press and hold the brake pedal. Note: Do not release the pedal until the bleed nipple is closed again.
- Loosen the bleed nipple one quarter turn counterclockwise.
- Tighten the bleed nipple (torque 17-20 Nm).
- Have the assistant release the pedal.
- Repeat steps 13b-13e 4 times.
- Disconnect the bleed container and clean any brake fluid from the caliper.
Caution: If brake fluid is spilled on a painted surface, wash off immediately with clean water.
-
Attach a brake bleed container to the
outboard bleed nipple on the caliper.
-
Repeat step 13, using the inboard bleed nipple.
-
Repeat step 13, using the outboard bleed nipple
a second time.
- Remove the pressure bleeder in accordance with the manufacturer's instructions. Caution: If brake fluid is spilled on a painted surface, wash off immediately with clean water.
- Check the brake fluid level, and top off the fluid if required.
- Install the brake fluid reservoir cap.
- Reconnect 12V power.
- Reinstall the road wheel.
- Sit in the driver's seat and pump the brake pedal several times. Check for a short, firm travel when the brakes are applied. Note: If the brake pedal is soft, bleed the complete system (refer to procedure).
- Perform a road test using a series of ABS-active stops and ensure proper brake pedal feel and performance.
Note: If the brake pedal is soft, bleed the complete system (refer to procedure).
READ NEXT:
 Bleed Procedure - System (Remove and Replace)
Warning: If the 12V
power supply is disconnected, do not attempt to open any doors
with door glass in closed position. Failure to follow this
instruction could result in door glass shat
Vacuum Brake Booster Assembly (Remove and Replace)
Caution: This procedure
describes how to remove and replace the vacuum brake booster
only. If the vehicle is equipped with an electromechanical brake
booster assembly, refer to procedur
Vacuum Pump (Remove and Replace)
Warning: If the vehicle
has air suspension, activate "Jack" mode on the touchscreen before
raising and supporting the vehicle.
Removal
Remove the underhood storage unit
SEE MORE:
Traction Control
How It Works
The traction control system constantly monitors the
speed of the front and rear wheels. If Model S
experiences a loss of traction, the system minimizes
wheel spin by controlling brake pressure and motor
power. By default, the traction control system is on.
Under normal conditions,
Forward Junction Box (Dual Motor) (Remove and Replace)
Warning: Only technicians who have been trained in High
Voltage Awareness are permitted to perform this procedure. Proper
personal protective equipment (PPE) and insulating HV gloves with a
minimum rating of class 00 (500V) must be worn any time a high
voltage cable is handled. Refer
