Tesla Model S: Vacuum Pump (Remove and Replace)
Tesla Model S (2012-2026) Service Manual / Brakes / Vacuum Pump (Remove and Replace)
Warning: If the vehicle has air suspension, activate "Jack" mode on the touchscreen before raising and supporting the vehicle.
Removal
- Remove the underhood storage unit (refer to procedure).
- Release the locking ring that secures the vacuum hose to the pump. Disconnect the hose from the vacuum pump.
-
Disconnect the harness connector from the
vacuum pump.

- Release the clips (x2) that secure the vacuum pump harness and connector to the vacuum pump mounting bracket.
-
Remove the bolt that secures the vacuum pump to
the vacuum pump mounting bracket (torque 10 Nm).
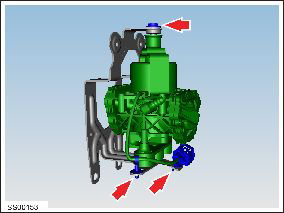
- Release the vacuum pump from the vacuum pump mounting bracket and remove it from the vehicle.
Installation procedure is the reverse of removal, except for the following:
- Ensure that the brake booster operates correctly before driving the vehicle.
- Ensure that the NVH foam is correctly installed and secured to the vacuum pump.
Note: Incorrectly installed or missing NVH foam can result in excessive noise when the pump is operating.
READ NEXT:
 Bracket - Vacuum Pump (Remove and Replace)
Warning: If the vehicle
has air suspension, activate "Jack" mode on the touchscreen before
raising and supporting the vehicle.
Removal
Remove the front skid plate
(ref
Reservoir - Master Cylinder (Remove and Replace)
Removal
Remove the master cylinder and reservoir
assembly
(refer to procedure).
Release the reservoir to master cylinder fixing
lugs (x4).
Release the reservoir
Brake Lines - Booster to ABS (Dual Motor) (RHD) (Remove and Replace)
Removal
Recover the A/C refrigerant from the vehicle
(refer to procedure).
Remove the 12V battery bracket beam
(refer to procedure).
Release the fasteners (x2) that
SEE MORE:
Assembly - Panel - Wrapped - LH (Remove and Replace)
Removal
Release the clips (x10) that secure the wrapped panel trim.
Note: Components have been removed in this graphic
to aid clarity.
Remove the LH wrapped panel trim.
Removing the Maintenance Panel
To check fluid levels, remove the maintenance panel:
1. Open the hood.
2. Pull the maintenance panel upward to release the
clips that hold it in place.
CAUTION: The maintenance panel protects the
front trunk from water. When re-attaching, make
sure it is fully seated.
Checking Battery Cool
© 2019-2026 Copyright www.tesms.org
