Tesla Model S: Brake Caliper - Rear - LH (Remove and Replace)
Warning: If the vehicle has air suspension, activate "Jack" mode on the touchscreen before raising and supporting the vehicle.
Removal
- Remove the rear underhood apron (refer to procedure).
- Remove the brake fluid reservoir cap and place an absorbent material around the opening of the reservoir. Note: Place suitable absorbent material around the affected area to absorb any possible fluid spillage. Caution: If brake fluid is spilled on a painted surface, wash off immediately with clean water.
- Remove the rear wheel (refer to procedure).
-
Remove the brake pad retaining pins and collect
the anti-rattle clip.
Note: Always check that the anti-rattle clip has not been damaged. This part is easily damaged and is important to help eliminate squeaks.
.png)
- Ease the caliper pistons back.
-
Remove the brake pads from the caliper.
.png)
- Remove the bolt and washers that secure the brake hose to the caliper (torque 34 Nm). Caution: Plug pipe connections to prevent ingress of moisture or dirt. Note: Place suitable absorbent material around the affected area to absorb any possible fluid spillage. Caution: If brake fluid is spilled on a painted surface, wash off immediately with clean water.
-
Remove and discard the bolts (x2) that secure
the caliper to the knuckle (torque 120 Nm).
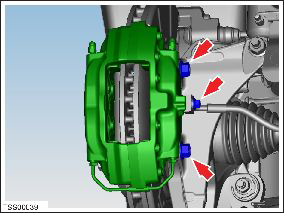
- Remove the caliper from the vehicle.
Installation procedure is the reverse of removal, except for the following:
Note: Clean the affected areas before installation.Caution: Ensure that the brake hose is aligned correctly with no excessive twist or bends.
Caution: Ensure that the retaining clip that secures the brake hose to the fixed bracket is oriented correctly.
-
Apply an even layer of Silaramic lubricant (1063021-00-A) to the
caliper pad slides. Remove any excess lubricant.
.png)
-
Apply an even layer of copper paste between the shim and the
backing plate on the brake pads. Remove any paste that squeezes
out after installing the shim.
Caution: Ensure that the brake pads move freely.
Caution: Do not apply copper paste to the caliper, seals, or any component other than the shim and backing plate.
.png)
- Perform the brake bleed procedure (refer to procedure). Caution: If brake fluid is spilled on a painted surface, wash off immediately with clean water.
- Pump the brake pedal at least 5 times to seat the pads against the brake rotors.
Warning: Always check that the brake pads are seated correctly before driving the vehicle.
READ NEXT:
 Brake Pads - Front - Set (Remove and Replace)
Warning: If the
vehicle has air suspension, activate "Jack" mode on the
touchscreen before raising and supporting the vehicle.
Special tool required for this procedure:
Brake Pads - Rear - Set (Remove and Replace)
Warning: If the
vehicle has air suspension, activate "Jack" mode on the
touchscreen before raising and supporting the vehicle.
Special tool required for this procedure:
Shield - Dust - Brake - Front - LH (Remove and Replace)
Warning: If the vehicle
has air suspension, activate "Jack" mode on the touchscreen before
raising and supporting the vehicle.
Note: This procedure
describes how to remove and replace
SEE MORE:
Drive Cycle Calibration - Forward Facing Camera
Note: If available, calibrate the forward facing camera using
the Camera Calibration Target (refer to procedure).
Note: This procedure describes how to perform a drive cycle
calibration on the forward facing camera. It does not apply to the rear
facing camera.
Connect a laptop with To
Track Mode
Track Mode, available only on Plaid Model S vehicles, is
designed to modify the stability control, traction control,
regenerative braking, and cooling systems to increase
performance and handling while driving on closed
circuit courses. Track Mode improves cornering ability by
intelligently usi
