Tesla Model S: Brake Pads - Front - Set (Remove and Replace)
Warning: If the vehicle has air suspension, activate "Jack" mode on the touchscreen before raising and supporting the vehicle.
Special tool required for this procedure:
| Supplier | Part Number | Description |
| Tesla | 1057223-00-A | Hand Brush |
- Remove the rear underhood apron (refer to procedure).
-
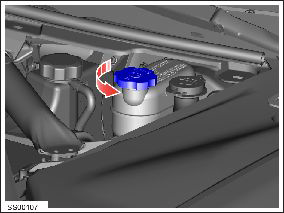
Remove the brake fluid reservoir cap.
Caution: Clean the surrounding area prior to removing the component.
Note: Place suitable absorbent material around the affected area to absorb any possible fluid spillage.
- Remove the front wheels (refer to procedure).
-
Remove the pad retaining pins and collect the
anti-rattle spring.
Note: Always check that the anti-rattle clip has not been damaged. This part is easily damaged and is important to help eliminate squeaks.
.png)
- Use a suitable tool to gently push the pistons back into caliper.
-
Remove the brake pads from the caliper.
.png)
- Check that the caliper pad slides are dirt free and the seals are in good condition.
Installation procedure is the reverse of removal, except for the following:
Note: Clean the affected areas before installation.
-
Thoroughly clean the caliper pad slides and abutments with a
hand brush (1057223-00-A) and soapy water.
Caution: If there is rust or pitting on the caliper that cannot be removed with a hand brush, replace the caliper (refer to procedure).
.png)
- Apply an even layer of Silaramic lubricant (1063021-00-A) to the caliper pad slides. Remove any excess lubricant.
-
Apply an even layer of copper paste between the shim and the
backing plate. Remove any paste that squeezes out after
installing the shim.
.png)
Caution: Ensure that the brake pads move freely. Caution: Do not apply copper paste to the caliper, seals, or any component other than the shim and backing plate.
- Pump the brake pedal at least 5 times to seat the pads against the brake rotors. Warning: Always check that the brake pads are seated correctly before driving the vehicle.
- Top off the brake fluid level as required. Caution: If brake fluid is spilled on a painted surface, wash off immediately with clean water.
- Perform the burnishing procedure (refer to procedure).
READ NEXT:
 Brake Pads - Rear - Set (Remove and Replace)
Warning: If the
vehicle has air suspension, activate "Jack" mode on the
touchscreen before raising and supporting the vehicle.
Special tool required for this procedure:
Shield - Dust - Brake - Front - LH (Remove and Replace)
Warning: If the vehicle
has air suspension, activate "Jack" mode on the touchscreen before
raising and supporting the vehicle.
Note: This procedure
describes how to remove and replace
Shield - Dust - Brake - Rear - LH (Remove and Replace)
Warning: If the vehicle
has air suspension, activate "Jack" mode on the touchscreen before
raising and supporting the vehicle.
Removal
Remove the rear hub (refer
to p
SEE MORE:
SIM Card - With SIM Extender (Remove and Replace)
Note: Vehicles in North America are not equipped with
a SIM extender; this procedure only applies to vehicles outside
of North America.
Removal
Remove the center underhood apron (refer to procedure).
Remove the cover from fuse box 2.
Vent - Center Console (Remove and Replace)
Removal
Remove center console rear closing panel (refer to procedure)
Move front center arm rests forward.
Using a suitable tool depress clips (x4) securing rear vent to
center console.
Remove rear vent.
