Tesla Model S: Shield - Dust - Brake - Rear - LH (Remove and Replace)
Tesla Model S (2012-2026) Service Manual / Brakes / Shield - Dust - Brake - Rear - LH (Remove and Replace)
Warning: If the vehicle has air suspension, activate "Jack" mode on the touchscreen before raising and supporting the vehicle.
Removal
- Remove the rear hub (refer to procedure).
-
Remove the screws (x3) that secure the rear
brake dust shield to the knuckle (torque 8 Nm).
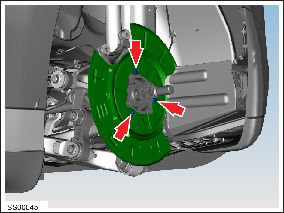
- Remove the rear brake dust shield.
Installation procedure is the reverse of removal. Note: Clean the affected areas before installation.
READ NEXT:
 Shield - Dust - Brake - Front - 2nd Generation (Retrofit)
Procedure
Remove the front hub assembly
(refer to procedure).
Install the dust shield using the 2 existing
holes in the knuckle (torque 8 Nm).
Master Cylinder and Reservoir Assembly (Remove and Install)
Note: This procedure
applies to vehicles with the vacuum brake booster only. If the
vehicle has the electromechanical brake booster assembly, the
master cylinder and reservoir assembly
Master Cylinder (Remove and Replace)
Note: This procedure
applies to vehicles with the vacuum brake booster only. If the
vehicle has the electromechanical brake booster assembly, the
master cylinder is part of the brake bo
SEE MORE:
Bushing Removal, Rear Motor Mount
Warning: To avoid personal injury, eye protection must
be worn when performing this operation.Warning: To avoid personal injury, safety-toe shoes and
cut-resistant gloves are recommended when performing this
operation.
Note: A demonstration video for removing and
r
Applique - Fascia - Front - 2nd Generation (Remove and Replace)
Note: This procedure describes how to remove and replace
the 2nd generation front fascia applique. If the vehicle is equipped
with a 1st generation front fascia applique, refer to procedure
10011402 (refer to procedure).
Removal
Remove the front fascia applique (refer t
© 2019-2026 Copyright www.tesms.org
