Tesla Model S: Brake Pads - Park Brake - Set (Remove and Replace)
Tesla Model S (2012-2026) Service Manual / Brakes / Brake Pads - Park Brake - Set (Remove and Replace)
Note: In the event of a stuck caliper or motor failure, refer to one of these procedures to release the caliper:
- Rear Park Brake Caliper - Caliper Seized/Motor Failure - Release (33051005) Caution: This method requires replacing the caliper after it has been released.
- Park Brake Caliper - Release - Harness Tool - Through Calipers (33051006)
- Park Brake Caliper - Release - Harness Tool - Through ECU (33051007)
Warning: If the vehicle has air suspension, activate "Jack" mode on the touchscreen before raising and supporting the vehicle.
- Raise and support the vehicle (refer to procedure).
- Release the electric park brake.
- Remove the road wheels (refer to procedure).
-
Remove the retaining pins and anti-rattle
spring.
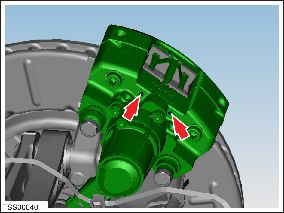
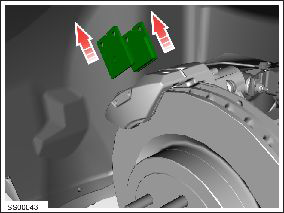
-
Remove the brake pads from the caliper.
Installation procedure is the reverse of removal, except for the following:
Note: Clean the affected areas before installation.
- Thoroughly clean the caliper pad slides with locally-accepted brake cleaner and ensure that the brake pads move freely.
Caution: Reinstall the brake pads without any copper paste or lubricant.
- Perform the burnishing procedure (refer to procedure).
READ NEXT:
 Brake Pads - Park Brake - Burnishing
Warning: Be sure to comply
with all local traffic safety laws and only perform such maneuvers in a
suitable location such as a nonresidential side street with little to no
traffic.
Caution:
ABS Modulator Assembly (Remove and Replace)
Warning: If the vehicle
has air suspension, activate "Jack" mode on the touchscreen before
raising and supporting the vehicle.
Removal
Remove the underhood storage unit f
Sensor - Wheel Speed - ABS - Front - LH (Remove and Replace)
Warning: If the vehicle
has air suspension, activate "Jack" mode on the touchscreen before
raising and supporting the vehicle.Removal
Remove the road wheel for access
(ref
SEE MORE:
Seat Assembly - 3rd Row (Remove)
Removal
Open the liftgate.
Fold down the third row seats.
Caution: Take care not to damage component(s).
Caution: Protect the interior trim from possible damage.
Remove the bolts that secure the third row seatbelt straps
(torque 26
Replacing Cabin Air Filters
Model S has an air filter that prevents pollen, industrial
fallout, road dust, and other particles from entering the
cabin through the vents. Tesla recommends replacing
these filters every 2 years (every year in China). Cabin
filters can be purchased at the Tesla online store.
To replace the ca
© 2019-2026 Copyright www.tesms.org
