Tesla Model S: Cabin Camera
Your Model S may be equipped with a cabin camera located above the rear view mirror.
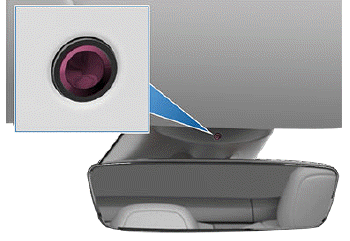
The cabin camera can determine driver inattentiveness and provide you with audible alerts, to remind you to keep your eyes on the road when Autopilot is engaged.
By default, images and video from the camera do not leave the vehicle itself and are not transmitted to anyone, including Tesla, unless you enable data sharing. If you enable data sharing and a safety critical event occurs (such as a collision), Model S shares short cabin camera video clips with Tesla to help us develop future safety enhancements and continuously improve the intelligence of features that rely on the cabin camera. Data may also be shared if diagnostics are required on cabin camera functionality. Cabin camera does not perform facial recognition or any other method of identity verification. To protect your privacy, cabin camera data is not associated with your vehicle identification number.
To adjust your data sharing preferences touch Controls > Software > Data Sharing > Allow Cabin Camera Analytics. You can change your data sharing settings at any time.
NOTE: Keep the camera lens clean and free of obstructions. Remove any buildup of dirt or dust by occasionally wiping the camera lens with a clean cloth.
CAUTION: Do not use chemical-based or abrasive cleaners. Doing so can damage the surface of the camera lens.
READ NEXT:
 Controls - Overview
Touch Controls on the bottom
corner of
the touchscreen to control features and
customize Model S to suit your
preferences. The Controls screen appears
over the map. Touch an option on the
Contr
SEE MORE:
Switch - Back Rest and Cushion Adjust - Driver's Seat (Remove and Replace)
Removal
Remove driver seat outer side cover (refer to procedure)
Remove screws (x4) securing back rest and cushion adjust switch
to cover (torque 1 Nm).
Remove back rest and cushion adjust switch.
Antenna - Satellite Radio - Liftgate-Mounted (Remove and Replace)
Note: This procedure is for vehicles built before December
23, 2014. On newer vehicles, the satellite radio antenna is located
under the panoramic roof fixed glass (refer to procedure).
Removal
Remove the liftgate glass (refer to procedure).
Disconnect the XM antenna co
