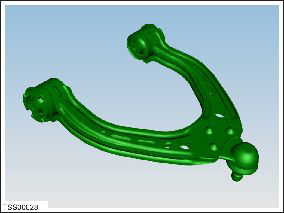
Tesla Model S: Control Arm - Upper - Front - RH (Remove and Replace)
Tesla Model S (2012-2026) Service Manual / Suspension / Control Arm - Upper - Front - RH (Remove and Replace)
Warning: If the vehicle has air suspension, activate "Jack" mode on the touchscreen before raising and supporting the vehicle.
Note: Graphics show the LH side. The RH side is similar.
Removal
- Position the vehicle in preparation for raising it, but keep the vehicle at ground level at this time.
- Remove the RH underhood apron. (refer to procedure)
- Remove the shock tower cover.
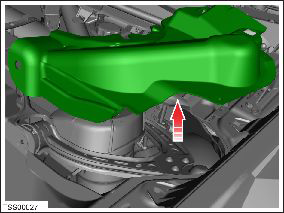
- Remove the 12V auxiliary battery. (refer to procedure)
- Raise and support the vehicle (refer to procedure). (refer to procedure) Warning: Do not work on an incorrectly supported vehicle.
- Remove the front RH upper wheel arch liner for access. (refer to procedure)
- Disconnect the ride height sensor from the upper control arm, if equipped.
- If necessary for access, remove the air spring module (refer to procedure) or spring and damper assembly. (refer to procedure)
- Remove the nut that secures the upper control arm to the knuckle (torque 60 Nm), then remove the bolt.
- Disconnect the upper control arm from the knuckle.
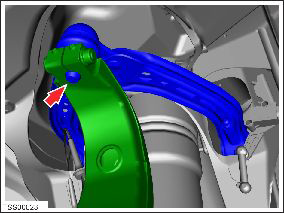
- Remove the rear bolt that secures the upper control arm to the
body (torque 68 Nm).

- Remove the front nut that secures the upper control arm to the body (torque 68 Nm), then remove the bolt.
- Release the upper control arm and remove it from the vehicle.
- Installation is the reverse of removal, except for the following. Caution: Only fully tighten suspension bushing fasteners when the vehicle is in ride height position. Note: Clean the affected areas before installation. Note: When tightening a nut and bolt assembly, hold the bolt while torquing the nut.
- Perform a four wheel alignment check. (refer to procedure)
READ NEXT:
 Link - Lower - Fore - LH (Remove and Replace)
Warning: If the vehicle has air suspension, activate "Jack"
mode on the touchscreen before raising and supporting the vehicle.
Removal
Loosen the front LH lug nuts.
Raise and
Link - Lower - Aft - LH (Remove and Replace)
Warning: If the vehicle has air suspension, activate "Jack"
mode on the touchscreen before raising and supporting the vehicle.
Removal
Loosen the front LH lug nuts.
Raise and sup
Suspension - Rear - Check Torque
Warning: If the vehicle has air suspension, activate "Jack"
mode on the touchscreen before raising and supporting the vehicle.
Check the tightening torque of the following fasteners:
Caution: On
SEE MORE:
HVAC Assembly (Remove and Replace)
Removal
Remove cross car beam (refer to procedure).
Recover refrigerant from AC system (refer to procedure).
Disconnect AC connection to HVAC, discard 'O' rings (torque 22
Nm).
Remove screws (x2) securing bulkhe
Air Line - Air Suspension - Reservoir to Compressor (Remove and Replace)
Removal
Raise and support the vehicle (refer to procedure).
Depressure the air suspension system (refer to procedure).
Disconnect 12V power.
Rear wheel drive (RWD): Refer to
procedure.
Dual Motor: Refer to procedure.
Remove the underho
© 2019-2026 Copyright www.tesms.org
