Tesla Model S: Air Spring Module - Front - LH (Remove and Replace)
Warning: If the vehicle has air suspension, activate "Jack" mode on the touchscreen before raising and supporting the vehicle. Removal
- Raise and support the vehicle (refer to procedure). Warning: Do not work on an incorrectly supported vehicle.
- Depressurize the air spring (refer to procedure).
- Remove the front road wheel (refer to procedure).
- Lower the vehicle.
- Remove the center underhood apron (refer to procedure).
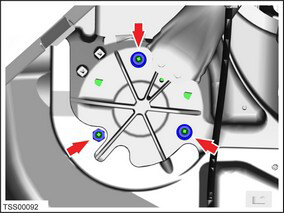
- Remove the nuts (x3) that secure the air spring module top mount
(torque 39 Nm).
- Raise the vehicle.
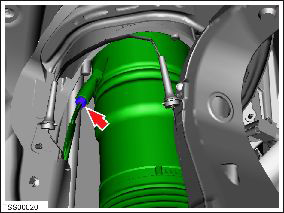
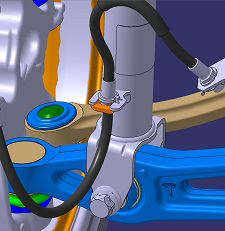
- Note the orientation of the clip that secures the brake hose to the air spring module. Release the clip.
- Remove the nut and bolt that secure the air spring module to the
lower arm (torque 140 Nm).
Caution: Take care not to damage component(s).
Caution: Replace all nylon-insert locknuts.
Note: The following image shows a rear wheel drive (RWD) air spring module. The air spring module in a dual motor (DM) vehicle looks different.
.png)
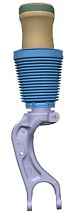
- Carefully compress the air spring module and release it from the
lower arm.
.png)
- Release the air pressure line from the chassis rail clip.
- Maneuver the air spring module to access the air pressure line. Caution: Thoroughly clean the air pressure line ports prior to disconnection. Failure to maintain cleanliness will adversely affect system performance.
- Undo the collar and remove the air pressure line (torque 5 Nm).
Caution: Plug pipe connections to prevent ingress of moisture or dirt.
- Remove the air spring module.
Caution: Ensure that you do not damage the halfshaft if removing an air spring module from a DM vehicle.
RWD air spring module DM air spring module 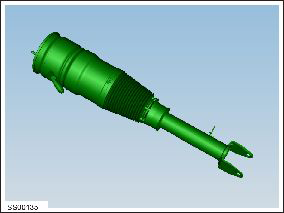
- Installation procedure is the reverse of removal, except for the following: Caution: Replace all nylon-insert locknuts. Note: Clean the affected areas before installation. Caution: Only fully tighten suspension nuts and bolts when the vehicle is on a 4-post lift and the suspension is in the ride height position.
- Ensure that the clip that secures the brake hose to the air
spring module is installed correctly.
- Rear wheel drive (RWD) vehicles: The hose
and the clip are installed from the same direction.
Note: Ensure that the clip is fully seated, with the "fingers" both remaining on the bottom side of the retaining bracket.
Top view, RWD (correct)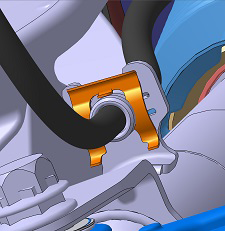
Bottom view, RWD (correct) - Dual motor (DM) vehicles: The clip is
installed from the rear.
Note: Ensure that the clip is fully seated, with the "fingers" both remaining on the bottom side of the retaining bracket.
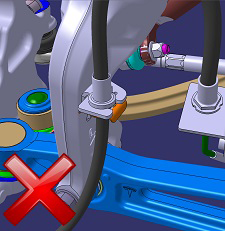
Top view, DM (incorrect)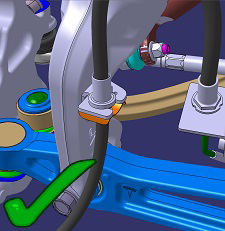
Top view, DM (correct)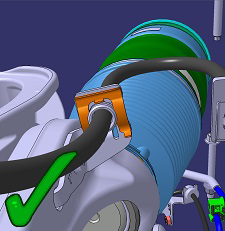
Bottom view, DM (correct)
- Rear wheel drive (RWD) vehicles: The hose
and the clip are installed from the same direction.
- Prior to attaching the air pressure line to the air spring module, ensure that all interfaces are clean to prevent possible leaks.
- Pressurize the air spring (refer to procedure).
READ NEXT:
 Air Spring Module - Rear - LH (Remove and Replace)
Warning: If the vehicle has air suspension, activate "Jack"
mode on the touchscreen before raising and supporting the vehicle.
Removal
Raise and support the vehicle (refer to procedu
Air Suspension - Pressurize/Depressurize - One Air Spring
Depressurize
Connect a laptop with Toolbox to the vehicle.
Press the brake pedal to turn on the drive rails.
Leave the driver's door open to keep the drive rails on.
In Toolbox, sele
Air Suspension - Depressurize - Full System
Depressurize
Connect a laptop with Toolbox to the vehicle.
Press the brake pedal to turn on the drive rails.
Leave the driver's door open to keep the drive rails on.
Use the Toolbox
SEE MORE:
Foam - Cushion
Foam - Cushion - Driver's Seat (Remove and Replace)
Removal
Note: This component cannot be serviced
individually. To service this component, perform the
following:
Replace the driver's seat trim and foam assembly (refer to
procedure).
Installation
Reservoir - Windshield Washer (Remove and Replace)
Removal
Remove the rear center underhood apron (refer to procedure).
Remove the plastic rivet that secures the reservoir neck to the
suspension shock tower.
Remove the washer pump from the reservoir (refer to pr
