Tesla Model S: Head Supports
The front seats include integrated head supports that you cannot adjust.
The rear outboard seating positions include an adjustable head support that can be raised/lowered or removed. The head support should always be raised and locked into position (so that the center is aligned with the center of the occupant's head) when occupied by a passenger that is not in a child safety seat.
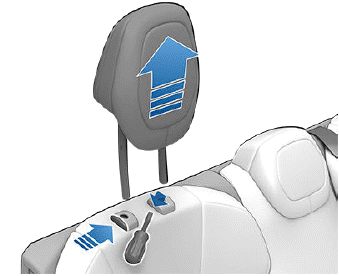
Lift the head support to the desired position. To lower the head support, press and hold the button on the base of the outer post while pushing down on the head support.
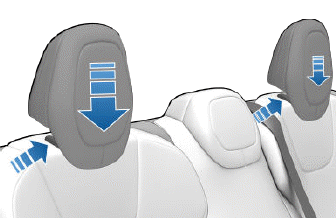
To remove a head support:
1. Lift the headrest to raise it.
2. Press and hold the button located at the base of the right post.
3. Insert a short, flat object (such as a small flat-head screwdriver) into the opening on the inside base of the opposite post and pull the head support upward.
Seat Heaters
All seats contain heating pads. In addition, both front seats are ventilated. You can control seat heaters in all seating positions using the touchscreen.
WARNING: To avoid burns resulting from prolonged use, individuals who have peripheral neuropathy, or whose capacity to feel pain is limited because of diabetes, age, neurological injury, or some other condition, should exercise caution when using the climate control system and seat heaters.
Seat Covers
WARNING: Do not use seat covers in Model S. Doing so could restrict deployment of the seat- mounted side air bags if a collision occurs. Seat covers can also interfere with the occupant detection system that is used to determine the status of the passenger front airbag.
READ NEXT:
 Wearing Seat Belts
Using seat belts and child safety seats is the most
effective way to protect occupants if a collision occurs.
Therefore, wearing a seat belt is required by law in most
jurisdictions.
Both the driv
To Fasten a Belt
1. Ensure correct positioning of the seat (see Correct
Driving Position).
2. Draw the belt out smoothly, ensuring the belt lays flat
across the pelvis, chest and mid-point of your collar
bone, betw
SEE MORE:
Managing Keys
To display a list of all keys (phone keys, key cards, and key fobs) that can
access your Model S, touch Controls > Locks. An icon displays next to each key
to indicate whether the key is a phone key, key card, or key fob. Use this list
to manage keys that have access to your Model S. To add or
Set Up HVAC Machine
Warning: Servicing must only be performed by personnel
familiar with both vehicle systems and the charging and testing
equipment. Always read and understand the HVAC machine operator's
manual before operating the HVAC machine.
Warning: R134a and R1234yf are hazardous liquids and, if
