Tesla Model S: Hood Assembly (Remove and Install)
Tesla Model S (2012-2026) Service Manual / Closures / Hood Assembly (Remove and Install)
Removal
- Remove the LH underhood apron for access (refer to procedure).
- Remove the RH underhood apron for access.
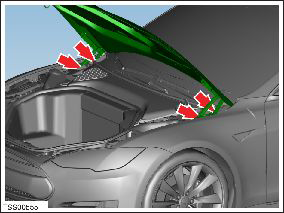
- Mark the installed position of the hood hinges to the body.
- With assistance, support the weight of the hood.
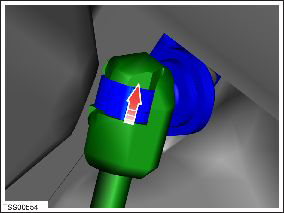
- Release the clips (x2) and disconnect the gas struts (x2) from
the hood mounting bracket ball joints.
- Remove the bolts (x4) that secure the LH and RH hood hinges to
the body (torque 24 Nm).
- With assistance, remove the hood.
Installation procedure is the reverse of removal, except for the following:
Note: Clean the affected areas before installation.
- Align the hood hinges to their previously marked locations.
- Check the alignment of the hood to the body and adjust as necessary.
READ NEXT:
 Hinge - Hood - LH (Remove and Replace)
Removal
Remove the hood assembly (refer to procedure).
Mark the installed position of the hinge to the hood.
Remove the nuts (x2 or x3) that secure the LH hinge to the hood
(torqu
Cable - Latch - Hood (RWD) (Remove and Replace)
Removal
Remove the hood latch cover (refer to procedure).
Release the hood release cable hook from the latch assembly.
Cable - Latch - Hood - LH (Dual Motor) (Remove and Replace)
Removal
Remove the underhood storage unit (refer to procedure).
Release the rear cable from the latch assembly.
Note: If performing this procedure on the
RH side, rele
SEE MORE:
Summon
NOTE: Depending on market region, vehicle
configuration, options purchased, and software version,
your vehicle may not be equipped with Summon, or the
feature may not operate exactly as described.
Summon allows you to automatically park and retrieve
Model S while you are standing outside the veh
Parts, Accessories, and
Modifications
Use only genuine Tesla parts and accessories. Tesla
performs rigorous testing on parts to ensure their
suitability, safety, and reliability. Purchase these parts
from Tesla, where they are professionally installed and
where you can receive expert advice about
modifications to Model S. Accessori
© 2019-2026 Copyright www.tesms.org
