Tesla Model S: Module - Air Suspension - ECU (Remove and Install)
Warning: If the 12V power supply is disconnected, do not attempt to open any doors with door glass in closed position. Failure to follow this instruction could result in door glass shatter.
Note: Before disconnecting the 12V power supply, ensure that the driver's door window is fully open. Failure to follow this instruction could result in vehicle lockout.
Removal
- Move both front seats to their rearmost positions.
- Disconnect 12V power.
- Rear wheel drive (RWD): Refer to procedure.
- Dual Motor: Refer to procedure.
- Remove the LH center console closeout extension (refer to procedure).
- Remove the RH center console closeout extension.
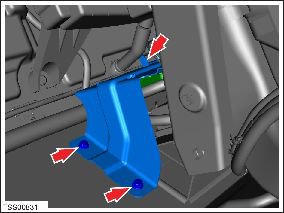
- Remove the bolts (x3) that secure the air suspension mounting
bracket to the body (torque metal bracket 8 Nm; plastic bracket 2
Nm).
Note: The horizontal bolt might be obscured by an acoustic pad. If it is, carefully move the acoustic pad aside for access.
- From the LH footwell, disconnect the HVAC drain hose from the
nipple.
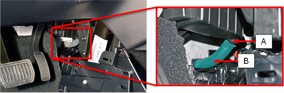
A HVAC nipple B HVAC drain hose - Gently lift up on the bracket and disconnect the harnesses
connectors (x2) at the rear of the air suspension ECU.
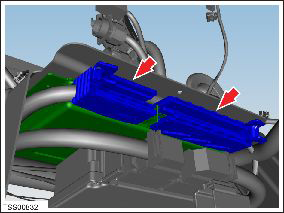
- Carefully place the bracket between the bulkhead and the HVAC drain hose.
Note: The bracket rests on the HVAC drain hose.
InstallationInstallation procedure is the reverse of removal.
READ NEXT:
 Module - Air Suspension - ECU (RHD) (Remove and Replace)
Warning: If the 12V power supply is disconnected, do
not attempt to open any doors with door glass in closed position.
Failure to follow this instruction could result in door glass
shat
Module - Air Suspension - ECU (RHD) (Remove and Install)
Warning: If the 12V power supply is disconnected, do
not attempt to open any doors with door glass in closed position.
Failure to follow this instruction could result in door glass
shat
Module - Passive Safety Restraint - PSRCM (Remove and Replace)
Warning: If the 12V power supply is disconnected, do
not attempt to open any doors with door glass in closed position.
Failure to follow this instruction could result in door glass
shat
SEE MORE:
While Driving
Cold weather can increase energy consumption because
more power is required for driving, cabin and Battery
heating. Follow these suggestions to reduce energy
consumption:
Use seat heaters to keep warm. Seat heaters use less
energy than the cabin heater. Lowering the cabin
temperature and us
Cable - Latch - Hood - LH (Dual Motor) (Remove and Replace)
Removal
Remove the underhood storage unit (refer to procedure).
Release the rear cable from the latch assembly.
Note: If performing this procedure on the
RH side, release the front cable.
