Tesla Model S: Module - Passive Safety Restraint - PSRCM (Remove and Replace)
Warning: If the 12V power supply is disconnected, do not attempt to open any doors with door glass in closed position. Failure to follow this instruction could result in door glass shatter.
Note: Before disconnecting the 12V power supply, ensure that the driver's door window is fully open. Failure to follow this instruction could result in vehicle lockout.
Removal
- Disconnect 12V power.
- Rear wheel drive (RWD): Refer to procedure.
- Dual Motor: Refer to procedure.
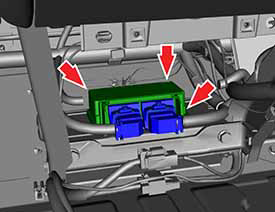
- Remove the active suspension ECU for access (refer to procedure).
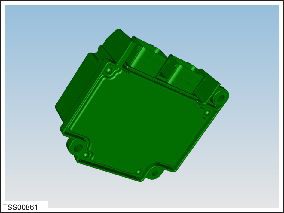
- Remove the T30 Torx bolts (x3) that secure the passive safety
restraint control module (PSRCM) to the body (torque 8 Nm).
Note: Components have been removed in this graphic to aid clarity.
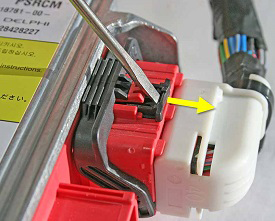
- Disconnect the harness connectors (x2):
Note: The following substeps only show the driver's side harness connector. Perform steps 4a-4c on both harness connectors.
- Carefully use a small flathead screwdriver to push the black
tab away from the PSRCM.
Caution: The tab can detach from the connector and become lost if excessive pressure is applied. Do not apply excessive pressure when pushing the black tab away from the PSRCM.
- Press and hold down the red tab.
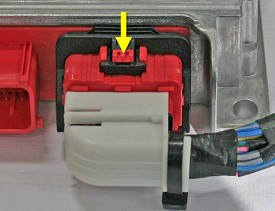
- While continuing to hold down the red tab, unlatch the
connector.
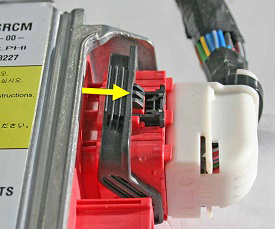
- Carefully use a small flathead screwdriver to push the black
tab away from the PSRCM.
- Remove the PSRCM from the vehicle.
Installation procedure is the reverse of removal, except for the following:
- Flash the PSRCM module:
- Connect a laptop with Toolbox 2.0 or later to the vehicle. Note: It is necessary to connect both the diagnostic cable and the chassis CAN cable.
- In Toolbox, select Panels > Restraint System > Airbag Program.
- Click the Run button.
- Follow the onscreen instructions and click Finish when finished.
- Sit in the driver's seat. Step on the brake pedal to turn on the drive rail to cycle the power on the vehicle.
- Ensure that the airbag safety indicator light displays on the
instrument cluster during vehicle startup and then turns off after 6
seconds.

READ NEXT:
 Module - Body Controller - BCM (Remove and Replace)
Warning: If the 12V power supply is disconnected, do
not attempt to open any doors with door glass in closed position.
Failure to follow this instruction could result in door glass
shat
Module - Body Controller - BCM (RHD) (Remove and Replace)
Removal
Remove the active suspension ECU (refer to procedure).
Remove the RH center console closeout extension (refer to
procedure).
Remove the RH footwell cover (refer to procedu
Module - Body Controller - BCM (Dual Motor) (RHD) (Remove and Replace)
Removal
Move both front seats to their rearmost positions.
Disconnect 12V power.
Rear wheel drive (RWD): Refer to
procedure.
Dual Motor: Refer to p
SEE MORE:
Summon
NOTE: Depending on market region, vehicle
configuration, options purchased, and software version,
your vehicle may not be equipped with Summon, or the
feature may not operate exactly as described.
Summon allows you to automatically park and retrieve
Model S while you are standing outside the veh
Exterior Release Switch - Liftgate (Remove and Replace)
Removal
Open the liftgate to a suitable working height.
Remove the applique from the liftgate (refer to procedure).
Caution: Take care not to damage component(s).
Caution: Protect paintwork from possible damage during
this procedure.
