Tesla Model S: Frame - Seat Base - 2nd Row - Executive (Remove and Replace)
Tesla Model S (2012-2026) Service Manual / Seats / Frame - Seat Base - 2nd Row - Executive (Remove and Replace)
Removal
- Remove the 2nd row back rest assembly (refer to procedure).
- Dual Motor vehicles only: Release the fasteners
(x4) that secure the inline fuse bracket to the seat frame (torque 5
Nm).
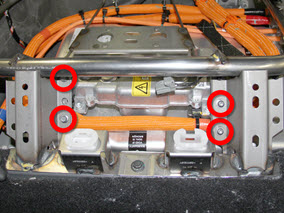
- On each side of the vehicle, release the outboard bolt that
secures the frame to the body (torque 26 Nm).
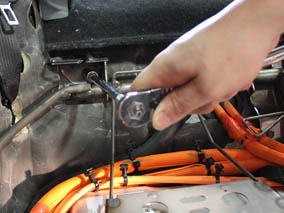
- On each side of the vehicle, release the inboard bolt that
secures the frame to the body (torque 26 Nm).
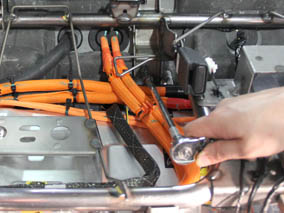
- On each side of the vehicle, release the edge clip that secures
the HV cables to the frame.

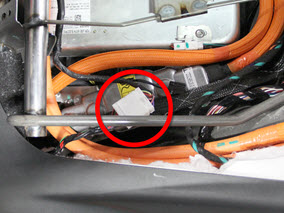
- On the LH side of the vehicle, disconnect the low voltage
harness.
- Remove the frame from the vehicle.
READ NEXT:
 Frame - Seat Back - 2nd Row Seat - LH (Remove and Replace)
Removal
Remove Rear LH seat back rest assembly and remove Pivot lock
from outboard side of assembly (refer to procedure)
Release and remove latch cover from seat back.
Frame - Seat Back - 2nd Row Seat - RH (Remove and Replace)
Removal
Remove Rear RH seat back rest assembly and remove Pivot lock
from outboard side of assembly (refer to procedure)
Release and remove latch cover from seat back.
Base Assembly - Front Passenger's Seat (Remove and Replace)
Removal
Remove the passenger's seat assembly (refer to procedure).
Place the seat on a clean work surface.
Remove the screws (x2) that secure the inner side cover to the
seat (tor
SEE MORE:
Autopilot Features
NOTE: Depending on market region, vehicle
configuration, options purchased, and software version,
your vehicle may not be equipped with all features listed
below, or a feature may not operate exactly as
described.
These Autopilot convenience features are designed to
reduce driver workload:
Tr
Set Up HVAC Machine
Warning: Servicing must only be performed by personnel
familiar with both vehicle systems and the charging and testing
equipment. Always read and understand the HVAC machine operator's
manual before operating the HVAC machine.
Warning: R134a and R1234yf are hazardous liquids and, if
© 2019-2026 Copyright www.tesms.org
