Tesla Model S: Sensor - Impact - B Pillar (Remove and Replace)
Tesla Model S (2012-2026) Service Manual / Safety and Restraint / Sensor - Impact - B Pillar (Remove and Replace)
Removal
- Remove the B-pillar lower trim (refer to procedure).
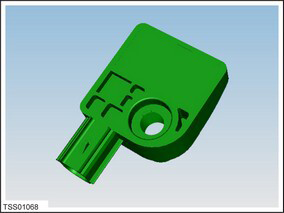
- Disconnect the impact sensor harness connector.
- Remove the bolt that secures the impact sensor to the B-pillar
(torque 8 Nm).
Caution: The bolt is left-hand threaded / reverse threaded.
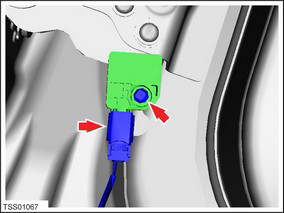
- Remove the impact sensor.
Installation procedure is the reverse of removal.
READ NEXT:
 Sensor - Impact - C Pillar (Remove and Replace)
Removal
Remove sill panel trim (refer to procedure)
Pull up lower portion of the 'C' post lower trim panel by
releasing the trim clips.
Caution: Take care not to damage co
Sensor - Occupant Classification - Front Passenger's Seat - Calibration
Note: The OCS is not installed in all markets and is
currently only present in North America. This OCS re-zero
calibration procedure is for North America.
OCS Re-Zero Calibration
En
Sensor - Pedestrian Protection (Remove and Replace)
Warning: If the 12V power supply is disconnected, do
not attempt to open any doors with door glass in closed
position. Failure to follow this instruction could result in
door glass shat
SEE MORE:
Multi-Collision Braking
In addition to Automatic Emergency Braking, your
vehicle may apply the brakes to prevent or mitigate a
subsequent impact after an initial collision if airbag
deployment is detected. The brakes may be applied
regardless of driving speed.
Obstacle-Aware Acceleration
Obstacle-Aware Acceleration is
Pivot Lock - Seat back - 2nd Row Seat - RH (Remove and Replace)
Removal
Remove rear seat back rest assembly (refer to procedure)
Remove E-clip securing pivot lock.
Slide pivot lock from backrest frame.
Installation
Installation procedure is the reverse
© 2019-2026 Copyright www.tesms.org
