Tesla Model S: Sensor - Impact - C Pillar (Remove and Replace)
Removal
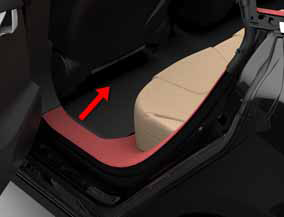
- Remove sill panel trim (refer to procedure)
- Pull up lower portion of the 'C' post lower trim panel by
releasing the trim clips.
Caution: Take care not to damage component(s).
Caution: Replace any broken clips.
- Remove 'B' pillar lower trim (refer to procedure)
- Disconnect impact sensor harness connector.
- Remove screw (x1) securing impact sensor to body (torque 8 Nm).
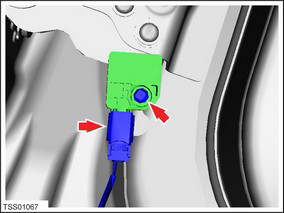
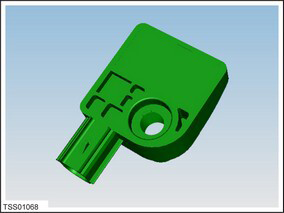
- Remove impact sensor.
Installation procedure is the reverse of removal.
Switch - Reminder - Seat Belt - Driver's Seat (Remove and Replace)
RemovalNote: This component cannot be serviced individually. To service this component, perform the following: Replace the driver's seat trim and foam assembly (refer to procedure).
Installation
Installation procedure is the reverse of removal.
Sensor - Occupant Classification - Front Passenger's Seat (Remove and Replace)
RemovalNote: This component cannot be serviced individually. To service this component, perform the following: Replace the passenger's seat base assembly (refer to procedure).
Installation
Installation procedure is the reverse of removal.
READ NEXT:
 Sensor - Occupant Classification - Front Passenger's Seat - Calibration
Note: The OCS is not installed in all markets and is
currently only present in North America. This OCS re-zero
calibration procedure is for North America.
OCS Re-Zero Calibration
En
Sensor - Pedestrian Protection (Remove and Replace)
Warning: If the 12V power supply is disconnected, do
not attempt to open any doors with door glass in closed
position. Failure to follow this instruction could result in
door glass shat
Actuator - Pedestrian Protection - LH (Remove and Replace)
Warning: If the 12V power supply is disconnected, do
not attempt to open any doors with door glass in closed
position. Failure to follow this instruction could result in
door glass shat
SEE MORE:
Fluids and Capacities
Fluids
Air conditioning
Depending on its intended sales region, the air conditioning system is
filled with R134a or 1234yf refrigerant. Refer to the label on the RH
frunk trim.
If oil needs to be added to the system, use only POE ND-11 or
equivalent.
Caution: Do not mix differe
Do Not Transport with Wheels On the Ground
The front and rear motors in Model S generate power
when the wheels spin. Always transport Model S with all
four tires off the ground. Ensure that the tires are unable
to spin at any time during transport.
WARNING: NEVER TRANSPORT YOUR VEHICLE
WITH THE TIRES IN A POSITION WHERE THEY
CAN SPI
