Tesla Model S: Assembly - Mesh Grille - Defrost (Remove and Replace)
Tesla Model S (2012-2026) Service Manual / Instrument Panels and Pedals / Assembly - Mesh Grille - Defrost (Remove and Replace)
Removal
- Remove the top pad for access to the mesh grille (refer to procedure)
- Remove the defrost mesh grille.
- Installation procedure is the reverse of removal.
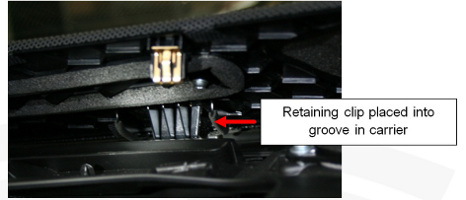
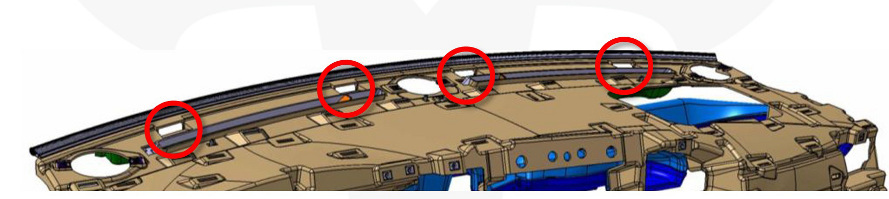
- When installing the new mesh grille, ensure that all 4 retaining
clips are positioned in the corresponding grooves in the carrier
before securing the trim clips.
- Ensure that the passenger's front airbag is reconnected properly when reinstalling the top pad (refer to procedure)
- Follow the proper glove box reinstallation procedure (refer to procedure)
- After all procedures are complete, sit in the driver's seat and press the brake pedal to turn on the drive rails. Ensure that the airbag safety indicator light exhibits normal operation: The light displays during vehicle startup, then turns off.
READ NEXT:
 Assembly - Top Pad - Instrument Panel (Remove and Install)
Warning: If the 12V power supply is disconnected, do
not attempt to open any doors with door glass in closed position.
Failure to follow this instruction could result in door glass
shat
Trim - Dash - Driver's Side - Lower (Remove and Replace)
Removal
Remove the LH instrument panel side cover (refer to procedure).
Remove the screw that secures the footwell cover to the
instrument panel trim panel (torque 2 Nm).
Usin
Assembly - Cover - Footwell - LH (Remove and Replace)
Removal
Fully open the driver's door.
Move the driver's seat rearward for access.
Remove the LH center console closeout extension (refer to
procedure)
Remove the screws (x2) t
SEE MORE:
Sensor - Level - Windshield Washer Reservoir (Remove and Replace)
Removal
Remove the front LH upper wheel arch liner (refer to procedure).
Position a container to collect any spillage.
Disconnect the level sensor connector.
Remove the level sensor from the washer reservoir.
IP Carrier (Remove and Replace)
Warning: If the 12V power supply is disconnected, do
not attempt to open any doors with door glass in closed position.
Failure to follow this instruction could result in door glass
shatter.
Note: Before disconnecting the 12V power supply,
ensure that the driver's door window
© 2019-2026 Copyright www.tesms.org
