Tesla Model S: Sensor - Motor - Speed (Remove and Replace)
Tesla Model S (2012-2026) Service Manual / Rear Drive Unit / Sensor - Motor - Speed (Remove and Replace)
Removal
- Remove the mid aero shield (refer to procedure).
- Disconnect the speed sensor connector.
- Remove the bolt that secures the speed sensor to the end bell
(torque 8 Nm).
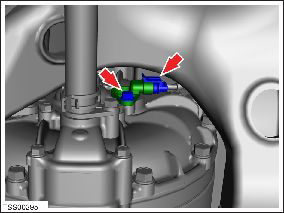
- Remove the speed sensor from the end bell.
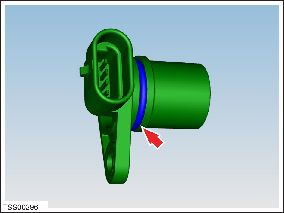
Note: Inspect the O-ring seal for damage and replace if necessary.
Warning: Only use cleaning agents and solvents in a well-ventilated area.
Note: Clean the affected areas before installation. Apply silicone O-ring lubricant to the O-ring before installation.
READ NEXT:
 Gearbox Fluid - Large Rear Drive Unit (Remove and Replace)
Warning: If the vehicle has air suspension,
activate "Jack" mode on the touchscreen before raising and
supporting the vehicle.
Drain & Refill
Raise and support the vehicle (refe
Gearbox Fluid - Small Rear Drive Unit (Remove and Replace)
Warning: If the vehicle has air suspension, activate "Jack"
mode on the touchscreen before raising and supporting the vehicle.
Drain & Refill
Position the vehicle in preparation for
Oil Seal - Differential to Driveshaft Assembly - LH (Remove and Replace)
Special tools required for this procedure:
Supplier
Part Number
Description
Tesla
1051509-
SEE MORE:
Wind Deflector Arm - LH (Remove and Replace)
Removal
The wind deflector arm is part of an assembly that
includes the wind deflector arm, wind deflector spring, and pivot
block.
Fully open the panoramic roof.
Release the screw that secures the wind
deflector arm to the wind deflector.
Seat Assembly - Driver's (Remove and Install)
Removal
Note the customer's seating profile.
Position the vehicle to provide good access to the driver's
seat.
Power the seat fully rearward for access.
Release the clips (x4) and remove the outer seat track cover.
© 2019-2026 Copyright www.tesms.org
