Tesla Model S: Solenoid - Air Suspension (Remove and Replace)
Tesla Model S (2012-2026) Service Manual / Suspension / Solenoid - Air Suspension (Remove and Replace)
Removal
- Raise and support the vehicle (refer to procedure).
- Depressurize the air suspension (refer to procedure).
- Access the solenoid.
- For vehicles manufactured before November 2014, remove the front aero shield (refer to procedure).
- For vehicles manufactured November 2014 and later, remove the underhood storage unit (refer to procedure).
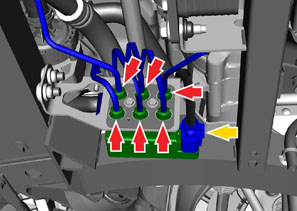
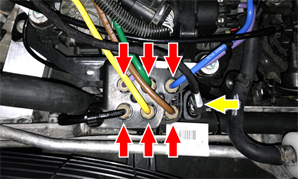
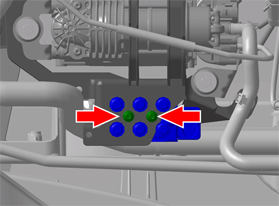
- Note the installed positions of the air lines and the release line unions (x6) from the solenoid (red arrows, torque 3.5 Nm). Caution: Plug pipe connections to prevent ingress of moisture or dirt.
- Disconnect the harness connector (yellow arrow).
- For vehicles manufactured before November 2014:
- For vehicles manufactured November 2014 and later:
- For vehicles manufactured before November 2014:
- Release the solenoid "out" line from the bracket clip. For vehicles manufactured November 2014 and later, skip to step 9.
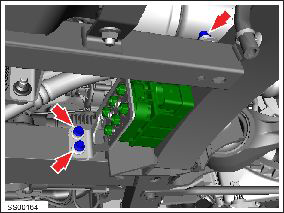
- Remove the bolts (x3) that secure the solenoid bracket to the
subframe (torque 5.5 Nm).
- Remove solenoid and bracket assembly.
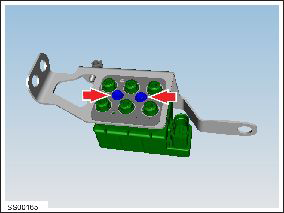
- Remove the hardware that secures the solenoid to the bracket.
- For vehicles manufactured before November 2014: Remove the
bolts (x2) that secure the solenoid to the mounting bracket
(torque 4 Nm).
- For vehicles manufactured November 2014 and later: Remove
the bolts (x2) that secure the solenoid to the compressor
bracket (torque 4 Nm).
- For vehicles manufactured before November 2014: Remove the
bolts (x2) that secure the solenoid to the mounting bracket
(torque 4 Nm).
- Remove the solenoid from the bracket.
Installation procedure is the reverse of removal, except for the following:
- Note: Clean the affected areas before installation.
- Pressurize the air suspension (refer to procedure).
READ NEXT:
 Reservoir - Air Suspension (Remove and Replace)
Removal
Raise and support the vehicle (refer to procedure).
Depressurize air reservoir (refer to procedure).
Remove underhood storage unit (refer to procedure).
Disconnect 12V
Sensor - Ride Height - Front - LH (Remove and Replace)
Warning: If the vehicle has air suspension, activate "Jack"
mode on the touchscreen before raising and supporting the vehicle.
Removal
Position the vehicle on a lift, but do not
Sensor - Ride Height - Rear - LH (Remove and Replace)
Warning: If the vehicle has air suspension, activate "Jack"
mode on the touchscreen before raising and supporting the vehicle.
Removal
Remove the road wheel (refer to procedure).
SEE MORE:
Sun Visor - Driver's (Remove and Replace)
Removal
Use a trim stick or other non-marring pry tool to release the
visor mounting cover.
Caution: Take care not to damage component(s).
Remove the screw that secures the sun visor to the roof.
Re
Starting/Discharging the System
Starting the System
Press the emergency stop button to disable HV systems.
Pull out the display/keyboard/trackpad tray.
Press the red power button to turn on the on-board PC.
Follow the onscreen instructions to log in to the system.
Userna
© 2019-2026 Copyright www.tesms.org
