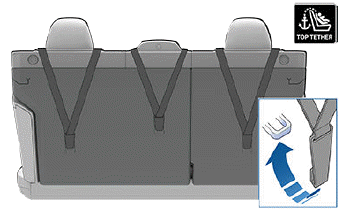
Tesla Model S: Attaching Upper Tether Straps
If an upper tether strap is provided, attach its hook to the anchor point located on the back of the rear seats.
NOTE: The location of anchor points may not be readily visible but can be found by identifying a slice in the seat's material.
WARNING: Tighten upper tether straps according to the instructions provided by the manufacturer of the child safety seat.
WARNING: USE ONLY SEAT BELT RETAINED CHILD SAFETY SEATS IN THE CENTER SEATING POSITION.
For dual-strap tethers, position the straps as shown.
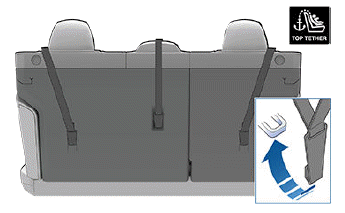
Position single-strap tethers for the outboard seating positions to run on the outside of the head support. Position a single strap in the center seating position to run over the top of the seat as illustrated.
NOTE: To prevent the single-strap tether in the center seating position from moving side to side, the top of the seat deforms.
Testing a Child Safety Seat
Before seating a child, always make sure the child safety seat is not loose:
1. Hold the child safety seat by the belt path and try to slide the safety seat from side to side and front to back.
2. If the seat moves more than one inch (2.5 cm), it is too loose. Tighten the belt or reconnect the LATCH retained child safety seat.
3. If you are unable to reduce slack, try a different seat location or try another child safety seat.
READ NEXT:
 Child Safety Seat Warnings
WARNING: Extreme hazard! Do not seat a child on
the front passenger seat even if you are using a
child safety seat. This seat has an airbag in front of
it. Although this airbag is disabled whe
Location of Airbags
Airbags are located in the approximate areas shown below. Airbag warning
information is printed on the sun visors.
Model S is equipped with an airbag and lap/shoulder belt at both front seating
pos
SEE MORE:
Back Rest Assembly - Seat - 2nd Row - LH (Remove and Install)
Removal
Remove rear seat base cushion for access (refer to procedure)
Remove the bolt that secures the seat belt to the 2nd row seat
base frame (torque 40 Nm).
Caution: This bolt is a one time use component. Ensure
that a new bolt is used during r
Jacking and Lifting
Jacking Procedure
Follow the steps below to lift Model S. Ensure that any
non-Tesla repair facility is aware of these lifting points.
1. Position Model S centrally between the lift posts.
2. If your Model S is equipped with air suspension, it
automatically self-levels, even when power is off (see
