Tesla Model S: Door Glass - LH - Rear - Adjust
Tesla Model S (2012-2026) Service Manual / Closures / Door Glass - LH - Rear - Adjust
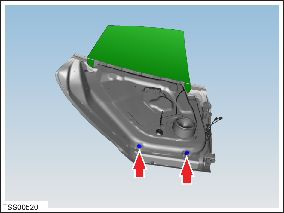
Removal
- Remove door trim pad (refer to procedure)
- Partially lower glass for access to glass clamp.
- Remove water proof tape for access to adjustment clamp.
- Loosen but do not remove clamp nut securing door glass to regulator (torque 7.5 Nm). This allows glass to move fore and aft. Caution: Take care not to damage component(s).
- Remove plugs (x2) from bottom of door covering regulator
adjustment nuts
- Loosen nuts (x2) securing regulator adjustment, inboard and
outboard to seal (torque 10 Nm).
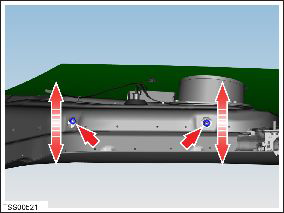
- Align door glass to create best fit condition, torque tighten glass clamp and regulator lower adjusters.
- Installation procedure is the reverse of removal, except for the following:
- Cover openings with waterproof adhesive tape.
- Check glass for smoothness of operation and seating to body opening seals, re-adjust if necessary.
READ NEXT:
 Door Glass - LH - Rear (Remove and Replace)
Removal
Remove door inner belt glass seal (refer to procedure)
Remove adhesive patches (x3) from glass access openings.
Remove screws (x2) securing door access panel (torque 4 Nm).
Door Glass - RH - Rear - Adjust
Removal
Remove door trim pad (refer to procedure)
Partially lower glass for access to glass clamp.
Remove water proof tape for access to adjustment clamp.
Loosen but do not remove
Window Guide Rail (Remove and Replace)
Window Guide Rail - Front - LH (Remove and Replace)
Removal
Remove front quarter body glass (refer to procedure)
Removal of the front quarter glass also removes front window
guide r
SEE MORE:
Unable to charge - Wall Connector issue
Wall Connector needs service
What this alert means:
Wall Connector hardware issue. Possible issues include:
Contactor not working
Self-test of internal ground fault monitoring circuit failed
Thermal sensor disconnected
Other hardware component issues
What to do:
An internal issue was detected
To Fasten a Belt
1. Ensure correct positioning of the seat (see Correct
Driving Position).
2. Draw the belt out smoothly, ensuring the belt lays flat
across the pelvis, chest and mid-point of your collar
bone, between the neck and shoulder.
3. Insert the latch plate into the buckle and press
together until you h
© 2019-2026 Copyright www.tesms.org
