Tesla Model S: Battery - Auxiliary - 12V (Dual Motor) (Remove and Replace)
Tesla Model S (2012-2026) Service Manual / Electrical / Battery - Auxiliary - 12V (Dual Motor) (Remove and Replace)
Warning: If the 12V power supply is disconnected, do not attempt to open any doors with door glass in closed position. Failure to follow this instruction could result in door glass shatter.
Note: Before disconnecting the 12V power supply, ensure that the driver's door window is fully open. Failure to follow this instruction could result in vehicle lockout.
Removal
- Disconnect 12V and HV power (refer to procedure).
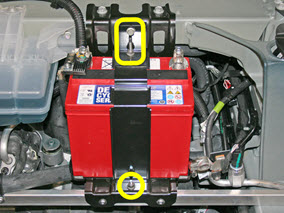
- Disconnect the 12V positive connection (torque 5 Nm).
- Release the 2 nuts (torque 5 Nm) and 1 bolt (torque 5 Nm) that
secure the 12V battery strap.
- Remove the battery from the tray.
Installation procedure is the reverse of removal.
READ NEXT:
 12V Positive Jump Post (Remove and Replace)
Warning: Before disconnecting the 12 volt power supply,
ensure that driver's door window is fully open. Failure to follow
this instruction could result in vehicle lockout.
Warning: If the
Fusebox - Battery (RHD) (Remove and Replace)
Warning: If the 12V power supply is disconnected, do
not attempt to open any doors with door glass in closed position.
Failure to follow this instruction could result in door glass
shat
12V Battery Bracket Beam (Remove and Replace)
Removal
Remove the 12V battery (refer to procedure).
Release the 2 bolts that secure the 12V battery bracket to the
front crossmember (torque 15 Nm).
SEE MORE:
Reservoir - Master Cylinder (Remove and Replace)
Removal
Remove the master cylinder and reservoir
assembly
(refer to procedure).
Release the reservoir to master cylinder fixing
lugs (x4).
Release the reservoir from the master cylinder
connections (x2).
Note: Place
suitable
Brake Pads - Park Brake - Set (Remove and Replace)
Note: In the event of a
stuck caliper or motor failure, refer to one of these procedures to
release the caliper:
Rear Park Brake Caliper - Caliper Seized/Motor Failure - Release
(33051005)
Caution: This method
requires replacing the caliper after it has be
© 2019-2026 Copyright www.tesms.org
