Tesla Model S: 12V Positive Jump Post (Remove and Replace)
Tesla Model S (2012-2026) Service Manual / Electrical / 12V Positive Jump Post (Remove and Replace)
Warning: Before disconnecting the 12 volt power supply, ensure that driver's door window is fully open. Failure to follow this instruction could result in vehicle lockout.
Warning: If the 12 volt power supply is disconnected, do not attempt to open any doors with door glass in closed position. Failure to follow this instruction could result in door glass shatter.
Removal
- If the vehicle has a 1st generation front fascia applique (nosecone), remove the front underhood apron (refer to procedure). If the vehicle has a 2nd generation front fascia applique (nosecone), remove the applique (refer to procedure).
- Disconnect 12V power.
- Rear wheel drive (RWD): Refer to procedure.
- Dual Motor: Refer to procedure.
- Check for voltage at the jump post. Ensure the voltage is 0V.
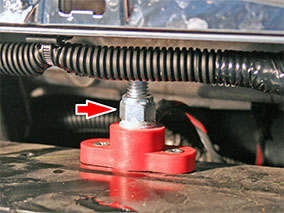
- Release the nut that secures the electrical harness to the jump
post (torque 6 Nm).
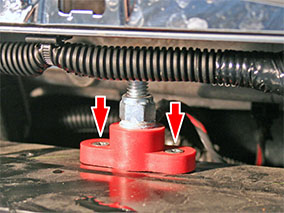
- Release the nuts (x2) that secure the jump post to the bumper
(torque 3 Nm).
- Remove the jump post from the vehicle.
Installation procedure is the reverse of removal.
READ NEXT:
 Fusebox - Battery (RHD) (Remove and Replace)
Warning: If the 12V power supply is disconnected, do
not attempt to open any doors with door glass in closed position.
Failure to follow this instruction could result in door glass
shat
12V Battery Bracket Beam (Remove and Replace)
Removal
Remove the 12V battery (refer to procedure).
Release the 2 bolts that secure the 12V battery bracket to the
front crossmember (torque 15 Nm).
Harness - Instrument Panel (Remove and Replace)
Removal
Remove the driver's and front passenger's seats (refer to
procedure).
Remove the center console assembly (refer to procedure).
Remove the IP carrier (refer to procedure).
SEE MORE:
Back Rest Assembly - Seat - 2nd Row - LH (Remove and Install)
Removal
Remove rear seat base cushion for access (refer to procedure)
Remove the bolt that secures the seat belt to the 2nd row seat
base frame (torque 40 Nm).
Caution: This bolt is a one time use component. Ensure
that a new bolt is used during r
Motor - Door - Exterior Handle - Front - LH (Remove and Replace)
Removal
Remove door handle for access (refer to procedure)
Position handle assembly on a soft working surface.
Remove door handle rear seal.
Release motor harness connector.
Remove cable ties securing door pressure sensor and motor
wiring.
Release motor wiring connec
© 2019-2026 Copyright www.tesms.org
