Tesla Model S: Battery - Auxiliary - 12V (RHD) (Remove and Replace)
Warning: If the 12V power supply is disconnected, do not attempt to open any doors with door glass in closed position. Failure to follow this instruction could result in door glass shatter.
Note: Before disconnecting the 12V power supply, ensure that the driver's door window is fully open. Failure to follow this instruction could result in vehicle lockout.
Removal
- Power down the vehicle from the MCU.
- Disconnect 12V power.
- Rear wheel drive (RWD): Refer to procedure.
- Dual Motor: Refer to procedure.
- Release the nut to disconnect the 12V positive connection (torque 6 Nm).
- Remove the nuts (x2) that secure the battery strap (torque 3
Nm). Remove the strap.
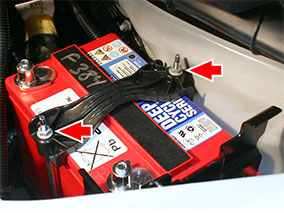
- Remove the forward stud from the battery bracket.
- Carefully lift the battery and remove it through the opening.
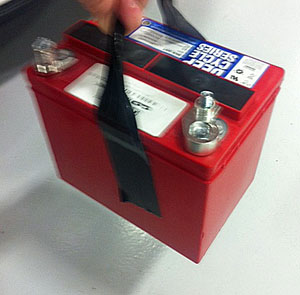
Note: It can be difficult to remove C&D brand
batteries because they do not have handles. It might be
helpful to use duct tape in order to lift the battery high
enough so that it can be supported from the bottom:
- Cut a piece of high-strength duct tape, approximately 18 in (45 cm) in length.
- Attach the ends of the duct tape to the long sides of the battery, leaving a large section of duct tape free above the battery. Twist this section of the duct tape back onto itself in order to form a handle.
- Using the handle, slowly lift the battery until it can be
supported from the bottom.
Warning: Do not use the handle to fully lift the battery out of the vehicle. Only lift the battery high enough so that it can be supported from the bottom.
Installation procedure is the reverse of removal.
READ NEXT:
 Battery - Auxiliary - 12V (Dual Motor) (Remove and Replace)
Warning: If the 12V power supply is disconnected, do
not attempt to open any doors with door glass in closed position.
Failure to follow this instruction could result in door glass
shat
12V Positive Jump Post (Remove and Replace)
Warning: Before disconnecting the 12 volt power supply,
ensure that driver's door window is fully open. Failure to follow
this instruction could result in vehicle lockout.
Warning: If the
Fusebox - Battery (RHD) (Remove and Replace)
Warning: If the 12V power supply is disconnected, do
not attempt to open any doors with door glass in closed position.
Failure to follow this instruction could result in door glass
shat
SEE MORE:
Solenoid - Air Suspension (Remove and Replace)
Removal
Raise and support the vehicle (refer to procedure).
Depressurize the air suspension (refer to procedure).
Access the solenoid.
For vehicles manufactured before November 2014, remove the
front aero shield (refer to procedure).
For vehicles manufac
HV Battery Coolant - Drain and Refill
Special tools required for this procedure:
Supplier
Part Number
Description
Tesla
1057671-00-A
BATTERY COOLANT DRAIN TOOL
Tesla
1057672-00-A
BATTERY COOLANT FIL
