Tesla Model S: Brake Caliper - Front - LH (Remove and Replace)
Warning: If the vehicle has air suspension, activate "Jack" mode on the touchscreen before raising and supporting the vehicle.
Removal
- Remove the rear underhood apron (refer to procedure).
- Remove the brake fluid reservoir cap and place an absorbent material around the opening of the reservoir. Note: Place suitable absorbent material around the affected area to absorb any possible fluid spillage. Caution: If brake fluid is spilled on a painted surface, wash off immediately with clean water.
- Remove the front wheel (refer to procedure).
- Remove the brake pad retaining pins.
-
Collect the anti-rattle clip.
Note: Always check that the anti-rattle clip has not been damaged. This part is easily damaged and is important to help eliminate squeaks.
.png)
- Ease the caliper pistons back.
-
Remove the brake pads from the caliper and
collect the shims (x2).
.png)
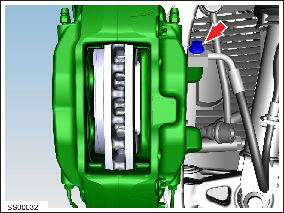
-
Remove the bolt and washers that secure the
brake hose to the caliper (torque 34 Nm).
Caution: Plug pipe connections to prevent ingress of moisture or dirt.
Note: Place suitable absorbent material around the affected area to absorb any possible fluid spillage.
Caution: If brake fluid is spilled on a painted surface, wash off immediately with clean water.
-
Remove and discard the bolts (x2) that secure
the caliper to the knuckle (torque 120 Nm).
.png)
- Remove the caliper from the vehicle.
Installation procedure is the reverse of removal, except for the following:
Caution: Ensure that the brake hose is aligned correctly with no excessive twist or bends.Note: If the brake hose is removed from the caliper, it must be replaced; the crush washers are not serviceable parts.
-
Apply an even layer of Silaramic lubricant (1063021-00-A) to the
caliper pad slides. Remove any excess lubricant.
.png)
-
Apply an even layer of copper paste between the shim and the
backing plate on the brake pads. Remove any paste that squeezes
out after installing the shim.
Caution: Ensure that the brake pads move freely.
Caution: Do not apply copper paste to the caliper, seals, or any component other than the shim and backing plate.
.png)
- Perform the brake bleed procedure (refer to procedure). Caution: If brake fluid is spilled on a painted surface, wash off immediately with clean water.
- Pump the brake pedal at least 5 times to seat the pads against the brake rotors.
Warning: Always check that the brake pads are seated correctly before driving the vehicle.
READ NEXT:
 Brake Caliper - Rear - LH (Remove and Replace)
Warning: If the vehicle
has air suspension, activate "Jack" mode on the touchscreen before
raising and supporting the vehicle.
Removal
Remove the rear underhood apron
Brake Pads - Front - Set (Remove and Replace)
Warning: If the
vehicle has air suspension, activate "Jack" mode on the
touchscreen before raising and supporting the vehicle.
Special tool required for this procedure:
Brake Pads - Rear - Set (Remove and Replace)
Warning: If the
vehicle has air suspension, activate "Jack" mode on the
touchscreen before raising and supporting the vehicle.
Special tool required for this procedure:
SEE MORE:
200A Fuses - Wall Connector (Remove and Replace) - Installation
Installation
Clean the contact surfaces of the new upper and lower bus bars
with alcohol wipes.
Position the new inner fuse. Install the screw at the L2
terminal (torque 3 Nm).
Install the inner wire's ring lug on the inner contactor stud.
Caution: Position both
Badge - Ludicrous Speed (Retrofit)
Special tool required for this procedure:
Supplier
Part Number
Description
Tesla
1054190-00-A
FEELER GAUGES
Procedure
Note: This procedure onl
