Tesla Model S: Sensor - Intrusion - Door - Front (Remove and Replace)
Tesla Model S (2012-2026) Service Manual / Safety and Restraint / Sensor - Intrusion - Door - Front (Remove and Replace)
Removal
- Remove door trim panel (refer to procedure)
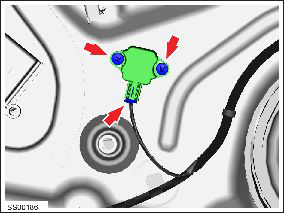
- Remove screws (x2) securing impact sensor to door (torque 5 Nm).
- Disconnect sensor harness connection.

Installation procedure is the reverse of removal.
READ NEXT:
 Sensor - Impact - Front (Remove and Replace)
Warning: To avoid personal injury, observe all relevant
safety precautions before removing or testing any SRS components.
Removal
Remove the underhood storage unit:
 Sensor - Impact - B Pillar (Remove and Replace)
Removal
Remove the B-pillar lower trim (refer to procedure).
Disconnect the impact sensor harness connector.
Remove the bolt that secures the impact sensor to the B-pillar
(torque
 Sensor - Impact - C Pillar (Remove and Replace)
Removal
Remove sill panel trim (refer to procedure)
Pull up lower portion of the 'C' post lower trim panel by
releasing the trim clips.
Caution: Take care not to damage co
SEE MORE:
 Forward Junction Box - 2nd Generation - 20 Amp Fuse (RWD) (Remove and
Replace)
Warning: Only technicians who have been trained in High
Voltage Awareness are permitted to perform this procedure. Proper
personal protective equipment (PPE) and insulating HV gloves with a
minimum rating of class 00 (500V) must be worn any time a high
voltage cable is handled. Refer
 Factors Affecting Energy
Consumption
While driving:
Elevated driving speed.
Environmental conditions such as cold or hot weather
and wind.
Using climate controls to heat or cool the cabin.
Uphill travel: Driving uphill requires more energy and
depletes range at a faster rate. However, driving
downhill allows your vehicle to
© 2019-2026 Copyright www.tesms.org

