Tesla Model S: Brake Caliper - Rear - Park Brake - LH (Remove and Replace)
Tesla Model S (2012-2026) Service Manual / Brakes / Brake Caliper - Rear - Park Brake - LH (Remove and Replace)
Note: If the event of a stuck caliper or motor failure, refer to one of these procedures to release the caliper:
- Rear Park Brake Caliper - Caliper Seized/Motor Failure - Release Caution: This method requires replacing the caliper after it has been released.
- Park Brake Caliper - Release - Harness Tool - Through Calipers
- Park Brake Caliper - Release - Harness Tool - Through ECU
- Remove the brake pads from the caliper (refer to procedure).
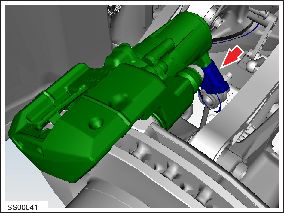
-
Disconnect the electric parking brake caliper
harness connector.
-
Remove and discard the bolts (x2) that secure
the caliper to the knuckle (torque 57 Nm).
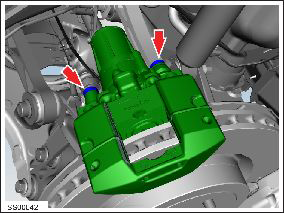
- Remove the parking brake caliper.
Installation procedure is the reverse of removal, except for the following:
- Clean the affected areas before installation.
- After connecting the electric parking brake caliper harness, wrap the connector seam with electrical tape to prevent dirt ingress.
READ NEXT:
 Brake Pads - Park Brake - Set (Remove and Replace)
Note: In the event of a
stuck caliper or motor failure, refer to one of these procedures to
release the caliper:
Rear Park Brake Caliper - Caliper Seized/Motor Failure - Release
Brake Pads - Park Brake - Burnishing
Warning: Be sure to comply
with all local traffic safety laws and only perform such maneuvers in a
suitable location such as a nonresidential side street with little to no
traffic.
Caution:
ABS Modulator Assembly (Remove and Replace)
Warning: If the vehicle
has air suspension, activate "Jack" mode on the touchscreen before
raising and supporting the vehicle.
Removal
Remove the underhood storage unit f
SEE MORE:
Drive Unit - Rear - Large (Remove and Install)
Special tools required for this procedure:
Supplier
Part Number
Description
Tesla
1000991
Axle Extractor
Note: Use 1000991 for a large drive unit only.
Coolant Heater - Electric - Battery (Dual Motor) (Remove and Replace)
Warning: Only technicians who have been trained in High
Voltage Awareness are permitted to perform this procedure. Proper
personal protective equipment (PPE) and insulating HV gloves with a
minimum rating of class 00 (500V) must be worn any time a high
voltage cable is handled. Refer
© 2019-2026 Copyright www.tesms.org
