Tesla Model S: Panel - Aero Shield - Mid (Remove and Replace)
Tesla Model S (2012-2026) Service Manual / Exterior fittings / Panel - Aero Shield - Mid (Remove and Replace)
Removal
- Remove the LH diffuser tray rails (refer to procedure).
- Repeat step 1 for the RH diffuser tray rails.
- Remove the bolts (x9) that secure the mid aero shield panel to
the body (torque 4 Nm).
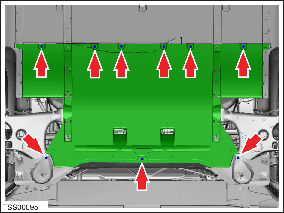
- Remove the mid aero shield panel.
Installation procedure is the reverse of removal.
READ NEXT:
 Panel - Diffuser Tray - Rear (Remove and Replace)
Removal
Remove rear fascia assembly (refer to procedure)
Remove bolts (x6) and plastic rivets (x2) securing rear diffuser
to rear fascia and applique (torque 3 Nm).
Rails - Diffuser Tray Rear - LH (Remove and Replace)
Warning: If the vehicle has air suspension, activate "Jack"
mode on the touchscreen before raising and supporting the vehicle.
Removal
Raise and support the vehicle (refer to pro
Rear Lettering (Remove and Replace)
Special tool(s) required for this procedure:
Supplier
Part Number
Template color
Description
SEE MORE:
Before Using Smart Summon
Download the latest version of the Tesla mobile app
to your phone, and ensure your phone has cellular
service and GPS enabled.
Your phone must be connected to Model S and
located within approximately 213 feet (65 meters).
The vehicle's cameras must be fully calibrated (see
Drive to Calib
Subframe Assembly - Front (Remove and Replace)
Removal
Remove front subframe assembly for access
(refer to procedure)
Remove and discard the bolts (x2) securing
steering rack assembly to subframe (torque 175 Nm).
Caution: Replace all
Patchbolt(s).
Caution:
Ensure that the bolts ar
© 2019-2026 Copyright www.tesms.org
