Tesla Model S: Center Console - 2nd Row - Executive (Remove and Replace)
Tesla Model S (2012-2026) Service Manual / Interior trim / Center Console - 2nd Row - Executive (Remove and Replace)
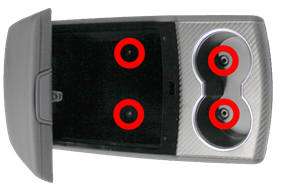
Removal
- Move both front seats all the way forward.
- Remove the felt tray from the console.
- Remove the rubber padding from the base of the console and cupholders.
- Release the screws (x4) that secure the center console.
Installation procedure is the reverse of removal.
READ NEXT:
 Finisher - Floor - Center Console (Remove and Replace)
Special tool required for this procedure:
Supplier
Part Number
Description
Headlining (Remove and Install)
Note: This procedure does not remove headlining from
vehicle, the headlining remains captive within the body.
Removal
Remove LH 'A' post trim (refer to procedure)
Remove RH '
Headlining (Remove and Replace)
Removal
Remove front windshield (refer to procedure)
Lower headlining for access (refer to procedure)
With assistance remove headlining through front windshield
opening.
Remov
SEE MORE:
Polishing, Touch Up, and Body
Repair
To preserve the cosmetic appearance of the body, you
can occasionally treat the paint surfaces with an
approved polish containing:
Very mild abrasive to remove surface contamination
without removing or damaging the paint.
Filling compounds that fill scratches and reduce their
visibility.
W
Panel - Door Trim - LH - Front (Install)
Installation
Installation procedure is the reverse of removal, except for the
following:
Caution: Do not reuse the heart flex clips; they are
one-time use only.
Vehicles with next generation seats: To secure the retention
strap to the door, perform the following s
© 2019-2026 Copyright www.tesms.org
