Tesla Model S: Headlining (Remove and Replace)
Tesla Model S (2012-2026) Service Manual / Interior trim / Headlining (Remove and Replace)
Removal
- Remove front windshield (refer to procedure)
- Lower headlining for access (refer to procedure)
- With assistance remove headlining through front windshield opening.
- Remove rear map lamps from headlining.
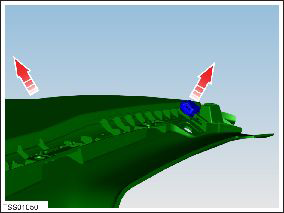
- Release clips (x2) securing overhead console to headlining.
- Remove overhead console.
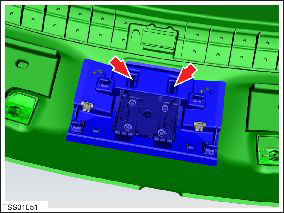
- Remove screws (x2) securing front map lamps to headlining.
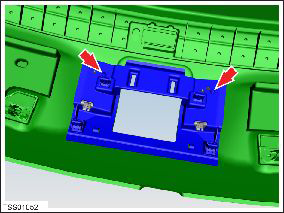
- Remove front lamp holder assembly.
Installation procedure is the reverse of removal.
READ NEXT:
 Headliner - Panoramic Roof (Remove and Install)
Note: This procedure does not remove the headliner from
vehicle; the headliner remains inside the vehicle cabin supported by
the tops of the seats.
Removal
Remove the LH A-pillar
Headlining - Panoramic Roof (Remove and Replace)
Removal
Remove front windshield (refer to procedure)
Lower headlining for access (refer to procedure)
With assistance remove headlining through front windshield
opening.
Remov
Underhood Storage Unit (RWD) (Remove and Install)
Removal
Remove the underhood storage extension box (refer to procedure).
Remove the rear underhood apron (refer to procedure).
Remove the front underhood apron (refer to procedure
SEE MORE:
Coolant Heater - Electric - Battery - 1st Generation (Remove and Replace)
Warning: Only technicians who have been trained in High
Voltage Awareness are permitted to perform this procedure. Proper
personal protective equipment (PPE) and insulating HV gloves with a
minimum rating of class 00 (500V) must be worn any time a high
voltage cable is handled. Refer
Compressor (Dual Motor) (RHD) (Remove and Replace)
Warning: Only technicians who have been trained in High
Voltage Awareness are permitted to perform this procedure. Proper
personal protective equipment (PPE) and insulating HV gloves with a
minimum rating of class 00 (500V) must be worn any time a high
voltage cable is handled. Refer
© 2019-2026 Copyright www.tesms.org
