Tesla Model S: Headlining (Remove and Install)
Tesla Model S (2012-2026) Service Manual / Interior trim / Headlining (Remove and Install)
Note: This procedure does not remove headlining from vehicle, the headlining remains captive within the body.
Removal
- Remove LH 'A' post trim (refer to procedure)
- Remove RH 'A' post trim.
- Release the LH upper 'B' post trim (refer to procedure).
- Release the RH upper 'B' post trim.
- Remove LH 'C' post trim (refer to procedure)
- Remove RH 'C' post trim.
- Remove driver sun visor (refer to procedure)
- Remove passenger sun visor.
- Remove rear view mirror (refer to procedure)
- Carefully release clips (x4) securing headlining center trim to cross rail. Caution: Take care not to damage component(s). Caution: Replace any broken clips.
- Release spigots (x3) and remove center headlining trim.
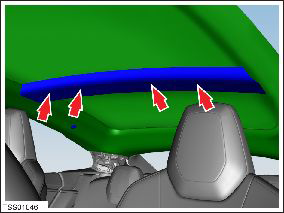
- Carefully release clips (x9) securing headlining to front
header.
Note: Components have been removed in this graphic to aid clarity.
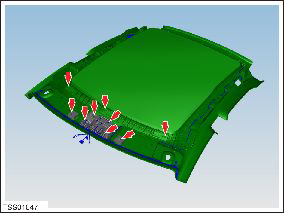
- Disconnect harness connectors (x5) from overhead console.

- Working front to back, release wiring harness from headlining and clips (x3).
- Release rear header clips (x3) and remaining cantrail clips (x6).
- Disconnect harness connectors from both rear map lights.
- Release wiring harness from rear headlining clips (x2).
- Position wiring harness aside for access.
- Cover and support headlining.
Installation procedure is the reverse of removal.
Note: The windshield must be removed for access, if headlining is being replaced.
READ NEXT:
 Headlining (Remove and Replace)
Removal
Remove front windshield (refer to procedure)
Lower headlining for access (refer to procedure)
With assistance remove headlining through front windshield
opening.
Remov
Headliner - Panoramic Roof (Remove and Install)
Note: This procedure does not remove the headliner from
vehicle; the headliner remains inside the vehicle cabin supported by
the tops of the seats.
Removal
Remove the LH A-pillar
Headlining - Panoramic Roof (Remove and Replace)
Removal
Remove front windshield (refer to procedure)
Lower headlining for access (refer to procedure)
With assistance remove headlining through front windshield
opening.
Remov
SEE MORE:
Tire - Front - LH - Rebalance
Warning: Always read and
understand the tire equipment operator's manual and on-screen
instructions before operating the wheel balancer or tire changer.
Note: These instructions are
based on the Hunter GSP9700 wheel balancer. Some steps might be
different for other wheel balancers. Refe
Seat Belt Assembly - 3rd Row - LH (Remove and Replace)
Removal
Maneuver the 3rd row seat for access to the anchor points (x4).
Remove the bolts (x4) that secure the seat belt to the body and
seat back (torque 45 Nm).
Release and remove the seat belt buckle webbing from the main
assembly.
Release
© 2019-2026 Copyright www.tesms.org
