Tesla Model S: Charging the Battery
- Select Manual Mode from the Charge/Discharge Mode menu.

- Type the desired SOC in the Target SOC% field, or drag the Target SOC% knob to the desired SOC.
- Turn on the HV power supply.
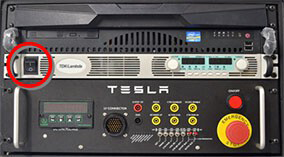
- Release the emergency stop button by turning the knob counter-clockwise.
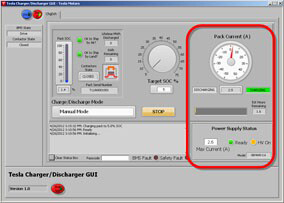
- When the green Ready light appears in the lower right corner of the software application, select the Start button. The Start button changes to a Stop button.
- The battery contactors close and charging begins. The pack
current, charging indicator, estimated hours remaining, HV Power
Supply Ready light, HV On light, and Max Current display on the
right side of the window.
- When the target SOC is reached, the tool automatically stops charging and opens the contactors. The charging operation can be manually stopped by pressing the Stop button in the software application. Note: The emergency stop switch on the charger/interface box can be used to immediately open the contactors in an emergency. Do not press the emergency stop switch except in an emergency, as it opens the contactors under load and disconnects power to the BMS, causing the Charger/Discharger Tool to lose communication with the BMS.
- When the operation is complete, make sure the contactor state is "Open", then engage the emergency stop switch.
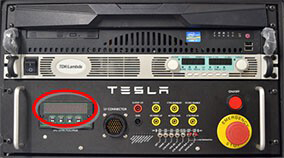
- Wait until the voltage displayed on the HV DC Link Voltmeter is
less than 5V, then shut down the PC.
- Turn off all powered components.
- Disconnect the HV battery.
READ NEXT:
 Troubleshooting
Charging does not start. The green "Ready" light in the software
application is dimmed.
Check that the HV power supply is plugged in and turned
on.
Check the connections at th
HV Battery Coolant - Drain and Refill
Special tools required for this procedure:
Supplier
Part Number
Description
Tesla
1057671-
SEE MORE:
How It Works
Your Model S includes the following components that actively monitor the
surrounding area:
A camera is mounted above the rear license plate.
Ultrasonic sensors are located in the front and rear bumpers.
A camera is mounted in each door pillar.
Three cameras are mounted to the windshield above
Battery Chiller and TXV Assembly (Remove and Replace)
Warning: If the 12V power supply is disconnected, do
not attempt to open any doors with door glass in closed position.
Failure to follow this instruction could result in door glass
shatter.
Note: Before disconnecting the 12V power supply,
ensure that the driver's door window
© 2019-2026 Copyright www.tesms.org
