Tesla Model S: Powertrain Coolant Pump 2 (Remove and Replace)
Tesla Model S (2012-2026) Service Manual / Thermal Management / Powertrain Coolant Pump 2 (Remove and Replace)
Coolant pump locations:
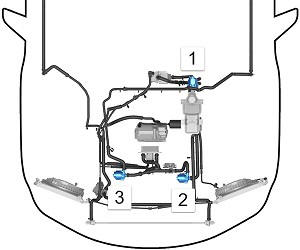
RWD Model S
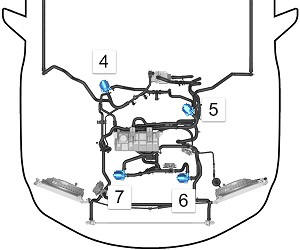
Dual Motor Model S
| 1 | Powertrain coolant pump 1 | RWD vehicle |
| 2 | Battery coolant pump 2 | RWD vehicle |
| 3 | Battery coolant pump 1 | RWD vehicle |
| 4 | Powertrain coolant pump 2 | Dual Motor vehicle |
| 5 | Powertrain coolant pump 1 | Dual Motor vehicle |
| 6 | Battery coolant pump 2 | Dual Motor vehicle |
| 7 | Battery coolant pump 1 | Dual Motor vehicle |
- Disconnect 12V and HV power (refer to procedure).
- Remove the HV battery (refer to procedure).
- Place suitable absorbent material beneath the pump.
- Clamp and release the 2 coolant hoses.
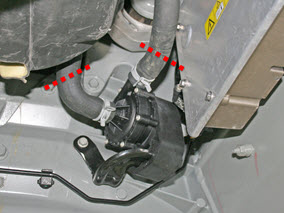
- Release the bolts (x2) that secure the coolant pump bracket to the body. Support the pump and disconnect the low voltage connector.
- Remove the pump from the bracket.
Installation procedure is the reverse of removal, except for the following:
- Clean any spilled coolant.
- When all components have been reinstalled, refill and bleed the cooling system (refer to procedure)
READ NEXT:
 Active Louver - Center (Remove and Replace)
Removal
Remove the front bumper (refer to procedure).
Remove the radiator (refer to procedure).
Remove the ankle catcher (refer to procedure).
Remove the plastic rivets (x3) that
Duct - Condenser LH (Remove and Replace)
Removal
Remove the front fascia assembly (refer to procedure).
Remove the bolts (x4) that secure the duct to the condenser
housing (torque 16 Nm on vehicles equipped with a magnesium
Motor - Active Louver - Front Fascia (Remove and Replace)
Removal
Remove front fascia active louver vent (refer to procedure)
Remove screws (x3) securing louver drive motor to vent assembly
(torque 1 Nm).
SEE MORE:
Installing ISOFIX (LATCH) Child
Seats
Lower LATCH anchors are provided in the rear outboard
seats. The anchors are located between the seat's back
rest and rear cushion. The exact location of each anchor
is identified by a child safety seat identification button,
illustrated below. The button is located on the seat back,
directly a
Wiper Blades - Adjust
If the wiper blades streak or chatter during cycling, perform the following:
Use the touchscreen to set the wipers to Service Mode.
Clean the wiper blades thoroughly with isopropyl alcohol wipes or
equivalent.
Clean the windshield thoroughly with isopropyl alcohol wipes or
equivalent. Ch
© 2019-2026 Copyright www.tesms.org
