Tesla Model S: Door Glass - RH - Rear - Adjust
Tesla Model S (2012-2026) Service Manual / Closures / Door Glass - RH - Rear - Adjust
Removal
- Remove door trim pad (refer to procedure)
- Partially lower glass for access to glass clamp.
- Remove water proof tape for access to adjustment clamp.
- Loosen but do not remove clamp nut securing door glass to regulator (torque 7.5 Nm). This allows glass to move fore and aft. Caution: Take care not to damage component(s).
- Remove plugs (x2) from bottom of door covering regulator
adjustment nuts
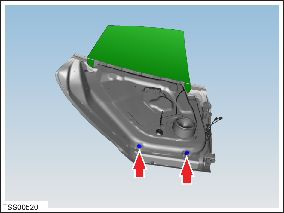
- Loosen nuts (x2) securing regulator adjustment, inboard and
outboard to seal (torque 10 Nm).
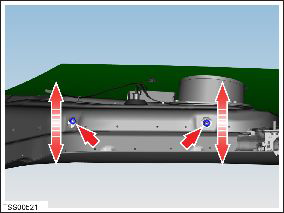
- Align door glass to create best fit condition, torque tighten glass clamp and regulator lower adjusters.
- Installation procedure is the reverse of removal, except for the following:
- Cover openings with waterproof adhesive tape.
- Check glass for smoothness of operation and seating to body opening seals, re-adjust if necessary.
READ NEXT:
 Window Guide Rail (Remove and Replace)
Window Guide Rail - Front - LH (Remove and Replace)
Removal
Remove front quarter body glass (refer to procedure)
Removal of the front quarter glass also removes front window
guide r
Window Motor/Regulator Assembly - Front - LH (Remove and Replace)
Removal
Remove window glass (refer to procedure)
Remove bolts (x3) securing door control unit to door and tie
aside (torque 1 Nm).
Remove screws (x6) securing regulator closing pa
Window Motor/Regulator Assembly - Rear - LH (Remove and Replace)
Removal
Remove rear window glass (refer to procedure)
Remove waterproof tape to expose nuts.
Note: Components have been removed in this graphic to aid
clar
SEE MORE:
Drop Link - Sway Bar - Rear - LH (Remove and Replace)
Removal
Remove the road wheel (refer to procedure).
Remove the nut that secures the sway bar drop link to the lower
control arm (torque 70 Nm).
Caution: To prevent ball joint damage, always hold the
ball joint pin with a wrench while loosening or tigh
Overview
NOTE: Entertainment options vary by market region.
The touchscreen displays the Entertainment screen when you choose any of the
following apps:
Theater: Play various video
streaming services (such as Netflix, YouTube, Hulu, etc.) while parked.
Arcade: Want to game? Depending
on the game, you ma
© 2019-2026 Copyright www.tesms.org
