Tesla Model S: Door Glass - LH - Rear (Remove and Replace)
Tesla Model S (2012-2026) Service Manual / Closures / Door Glass - LH - Rear (Remove and Replace)
Removal
- Remove door inner belt glass seal (refer to procedure)
- Remove adhesive patches (x3) from glass access openings.
- Remove screws (x2) securing door access panel (torque 4 Nm).
- Remove access panel.

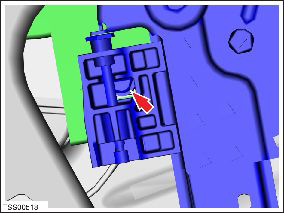
- Lower door glass and align with opening in door panel.
- Loosen but do not remove clamp nut securing door glass to
regulator (torque 7.5 Nm).
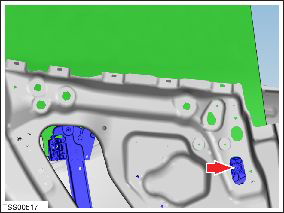
- Using a suitable tool, depress clip and pull leading edge of
glass vertically to release from regulator clip.
- Remove door glass.
- Installation procedure is the reverse of removal, except for the following:
- Cover all door panel openings with waterproof adhesive tape.
- Check window alignment and adjust if necessary.
READ NEXT:
 Door Glass - RH - Rear - Adjust
Removal
Remove door trim pad (refer to procedure)
Partially lower glass for access to glass clamp.
Remove water proof tape for access to adjustment clamp.
Loosen but do not remove
Window Guide Rail (Remove and Replace)
Window Guide Rail - Front - LH (Remove and Replace)
Removal
Remove front quarter body glass (refer to procedure)
Removal of the front quarter glass also removes front window
guide r
Window Motor/Regulator Assembly - Front - LH (Remove and Replace)
Removal
Remove window glass (refer to procedure)
Remove bolts (x3) securing door control unit to door and tie
aside (torque 1 Nm).
Remove screws (x6) securing regulator closing pa
SEE MORE:
Bushing Installation, Front Motor Mount
Use brake cleaner to clean the threaded rod and the nut bearing
assemblies.
Use 3M Spray Lube 08878 or equivalent to lubricate the threaded
rod and the nut bearing assemblies.
Slide the bushing into the left side of the front motor mount so
that the shorter cavities are horiz
Exterior/Interior Overview
Exterior Overview
NOTE: Depending on market region, vehicle configuration, and options
purchased, your vehicle may look slightly different than described.
Exterior lights
Door handles
Charge port
Autopilot cameras
Exterior mirrors
Hood/Front trunk
Front/rear tow eye cover
Wheels and tir
© 2019-2026 Copyright www.tesms.org
