Tesla Model S: Window Guide Rail (Remove and Replace)
Tesla Model S (2012-2026) Service Manual / Closures / Window Guide Rail (Remove and Replace)
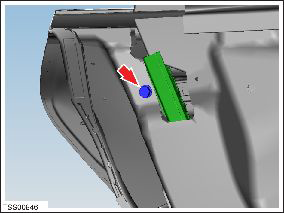
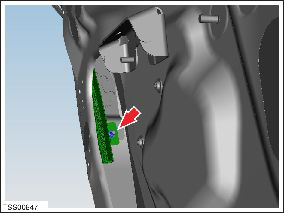
Window Guide Rail - Front - LH (Remove and Replace)
Removal- Remove front quarter body glass (refer to procedure)
- Removal of the front quarter glass also removes front window guide rail. Caution: Take care not to damage component(s).
Installation procedure is the reverse of removal.
Window Guide Rail - Rear - LH (Remove and Replace)
Note: This part has been deleted starting with VIN 5YJSA1DP9CFS00528, and is not found on vehicles built after October 11, 2012.Removal
- Raise door glass.
- Remove door trim pad (refer to procedure)
- Remove clip securing door seal and reposition door seal for
access.
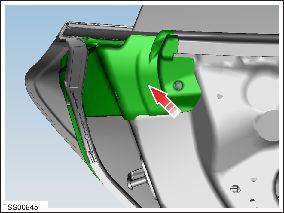
- Remove bolt securing window guide to door (torque 11 Nm). NOTE:
Seal removed for clarity.
- Remove nut securing window guide to door and remove guide
(torque 11 Nm).
Installation procedure is the reverse of removal.
READ NEXT:
 Window Motor/Regulator Assembly - Front - LH (Remove and Replace)
Removal
Remove window glass (refer to procedure)
Remove bolts (x3) securing door control unit to door and tie
aside (torque 1 Nm).
Remove screws (x6) securing regulator closing pa
Window Motor/Regulator Assembly - Rear - LH (Remove and Replace)
Removal
Remove rear window glass (refer to procedure)
Remove waterproof tape to expose nuts.
Note: Components have been removed in this graphic to aid
clar
Seal - Body - Side - Front - Primary - LH (Remove and Replace)
Removal
Remove the 'B' post upper trim (refer to procedure).
Release the clips (x3) that secure the leading edge of the seal
to the body.
Caution: Take care
SEE MORE:
Speaker - Rear - LH/RH (Remove and Replace)
Removal
Open tailgate to suitable working height.
Carefully release speaker cover clips (x9) from tailgate.
Caution: Take care not to damage component(s).
Remove speaker covers and position aside.
HOLD State
When following a vehicle, Traffic-Aware Cruise Control
remains active at low speeds, even when Model S comes
to a full stop. When the vehicle is moving again, Traffic-
Aware Cruise Control resumes operating at the set
speed. However, under the following circumstances,
Traffic-Aware Cruise Contro
© 2019-2026 Copyright www.tesms.org
