Tesla Model S: Fascia Assembly - Front (Remove and Install)
Tesla Model S (2012-2026) Service Manual / Body / Fascia Assembly - Front (Remove and Install)
Warning: If the vehicle has air suspension, activate "Jack" mode on the touchscreen before raising and supporting the vehicle.
Removal
- Remove the front underhood apron (refer to procedure).
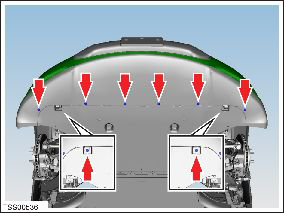
- Remove the plastic rivets (x8) that secure the undershield to
the chin spoiler.
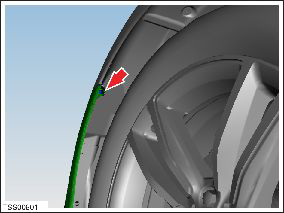
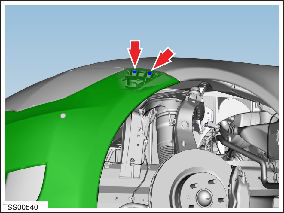
- Remove the screw that secures the fascia panel to the LH front
fender (torque 1.5 Nm).
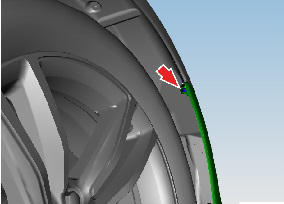
- Remove the screw that secures the fascia panel to the RH front
fender (torque 1.5 Nm).
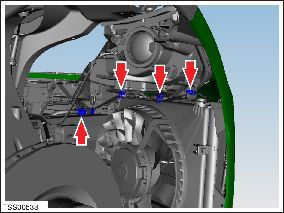
- Disconnect the fascia harness connector and release the clips
(x3) that secure the fascia harness to the front fascia carrier.
- Remove the bolts (x2) that secure the fascia and applique to the
fascia carrier (torque 4 Nm).
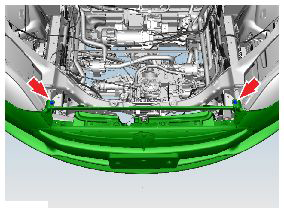
- Carefully release the fascia from the LH and RH fender bracket
lugs (x2).
- With assistance, release the fascia panel from the fascia carrier.
- Remove the fascia assembly.
- Remove any debris from the radiator and condensers.
Installation procedure is the reverse of removal, except for the following: If equipped, calibrate the front radar sensor (refer to procedure).
READ NEXT:
 Fascia Assembly - Front (Remove and Replace)
Removal
Remove the front fascia (refer to procedure).
Remove the front fascia applique:
If the vehicle has the 1st generation front fascia applique,
refer to proc
Bumper Assembly - Front (Remove and Replace)
Warning: If the 12V power supply is disconnected, do
not attempt to open any doors with door glass in closed position.
Failure to follow this instruction could result in door glass
shat
Ankle Catcher Assembly (Remove and Replace)
Removal
Remove the front fascia (refer to procedure).
Remove the bolts (x2) that secure the center of the ankle
catcher to the front ducting (torque 4 Nm).
SEE MORE:
Sensor - Parking Distance - Front - Each (Remove and Replace)
Removal
Remove the front fascia assembly (refer to procedure).
Set the fascia assembly on a flat, clean surface.
Disconnect the parking distance sensor connector.
Carefully release the parking di
Controlling the Passenger Front Airbag
Model S has an occupancy sensor in the front passenger seat that controls the
status of the front airbag.
NOTE: The occupancy classification system (OCS) meets the regulatory
requirement of FMVSS 208 and
automatically detects when inflating the passenger front airbag would be
unnecessary or pote
© 2019-2026 Copyright www.tesms.org
