Tesla Model S: Ankle Catcher Assembly (Remove and Replace)
Tesla Model S (2012-2026) Service Manual / Body / Ankle Catcher Assembly (Remove and Replace)
Removal
- Remove the front fascia (refer to procedure).
- Remove the bolts (x2) that secure the center of the ankle
catcher to the front ducting (torque 4 Nm).
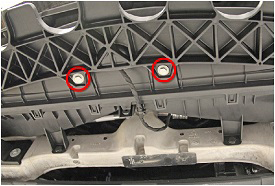
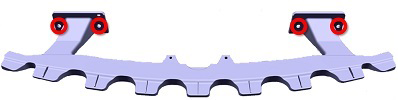
- Remove the bolts (x4) that secure the ankle catcher to the front
bumper carrier (torque 8 Nm).
Note: Components have been removed in this graphic to aid clarity.
Installation procedure is the reverse of removal.
READ NEXT:
 Applique - Fascia - Front - 1st Generation (Remove and Replace)
Note: This procedure describes how to remove and replace
the 1st generation front fascia applique. If the vehicle is equipped
with a 2nd generation front fascia applique, refer to procedure
Applique - Fascia - Front - 2nd Generation (Remove and Install)
Note: This procedure describes how to remove and
install the 2nd generation front fascia applique. If the vehicle is
equipped with a 1st generation front fascia applique, refer to
procedur
Applique - Fascia - Front - 2nd Generation (Remove and Replace)
Note: This procedure describes how to remove and replace
the 2nd generation front fascia applique. If the vehicle is equipped
with a 1st generation front fascia applique, refer to procedure
SEE MORE:
Sensor - Motor - Speed (Remove and Replace)
Removal
Remove the mid aero shield (refer to procedure).
Disconnect the speed sensor connector.
Remove the bolt that secures the speed sensor to the end bell
(torque 8 Nm).
Remove the speed sensor from the end b
Sensor - Parking Distance - Rear - Each (Remove and Replace)
Removal
Remove the rear fascia assembly (refer to procedure).
Set the fascia assembly on a flat, clean surface.
Disconnect the parking distance sensor connector.
Carefully release the parking dis
© 2019-2026 Copyright www.tesms.org
