Tesla Model S: Headlight - Adjust - Europe
Tesla Model S (2012-2026) Service Manual / Electrical / Headlight - Adjust - Europe
Europe (ECE)
- Position the vehicle for adjusting the headlights:
- The vehicle is in a darkened area.
- The vehicle is on a level surface.
- The vehicle is perpendicular to a wall that has a white matte surface. The wall must be at least 1.8m (6 ft) high and 3.7 m (12 ft) wide.
- The headlights are 10 m (32.8 ft) away from the wall.
- Ensure that all 4 tires are inflated to their recomended settings. Refer to General Information > Technical Data > Tire pressures.
- If the vehicle is equipped with air suspension, set the suspension height to standard.
- Ensure that the vehicle is level by rocking it from side to side.
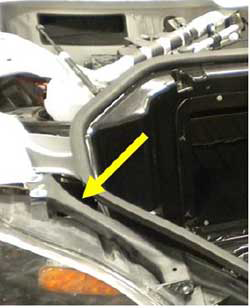
- Remove the LH and RH underhood aprons (refer to procedure).
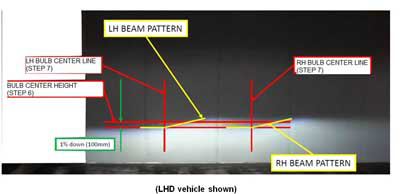
- Note the height between the ground and the center projecter lens
on the driver side headlight.
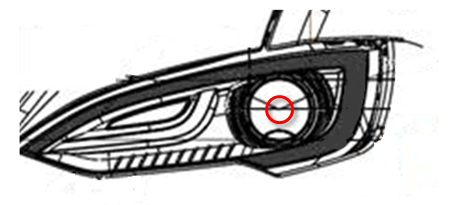
- Mark a straight line between each of the center projector lenses and the wall. At the point where each line meets the wall, mark the height that was noted in the previous step.
- Turn on the low beam headlights.
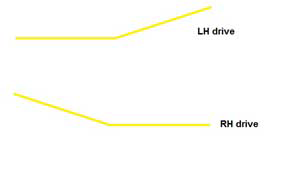
Note: For LHD vehicles, the left half the beam is flat, and the right half of the beam angles upward. For RHD vehicles, the right half of the beam is flat, and the left half of the beam angles upward.
- Cover the RH headlight; ensure that all light from the RH headlight is blocked.
- Locate the 2 adjusters on the LH headlight.
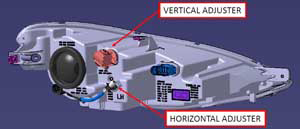
- Adjust the headlight horizontally so that the top of the flat part of the beam is 100 mm below the height that was noted in step 6.
- Adjust the headlight vertically so that the beam begins to angle
upward at the line that was marked in step 7.
- Repeat steps 9-12 to adjust the RH headlight.
READ NEXT:
 Headlight Assembly - LH (Remove and Replace)
Removal
Remove front fascia for access (refer to procedure)
Disconnect headlight connectors (x2).
Remove bolts (x4) sec
Tail Light Assembly (Non-Motorized Charge Port) - LH (Remove and Replace)
Special tool required for this procedure:
Supplier
Part Number
Description
Tesla
1054190-0
Tail Light Assembly (Motorized Charge Port) - LH (Remove and Replace)
Special tool required for this procedure:
Supplier
Part Number
Description
Tesla
1054190-0
SEE MORE:
Drop In Center Console Assembly (Remove and Replace)
Removal
Move the front seats to their rearmost positions to allow for
additional access.
Unplug the phone adaptor cable from the USB connector, if
installed.
Pull the two panels off from the sides of the center
Door - Charge Port - Single Phase - Motorized (Remove and Replace)
Note: The charge port door and motor are removed as an
assembly.
Removal
Remove the LH tail light assembly (refer to procedure).
Remove the screws (x3) that secure the charge port door to the
tail light assembly (torque 2.5 Nm).
© 2019-2026 Copyright www.tesms.org
