Tesla Model S: Tail Light Assembly (Motorized Charge Port) - LH (Remove and Replace)
Tesla Model S (2012-2026) Service Manual / Electrical / Tail Light Assembly (Motorized Charge Port) - LH (Remove and Replace)
Special tool required for this procedure:
| Supplier | Part Number | Description |
| Tesla | 1054190-00-A | Feeler Gauges |
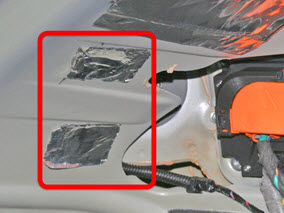
- Remove the charge port (refer to procedure).
- Remove the 2 butyl patches to expose the rear nuts that secure
the LH taillight.
Note: If necessary, replace the butyl patches.
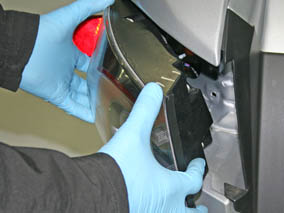
- Release the 3 nuts that secure the LH taillight to the body (torque 3.5 Nm).
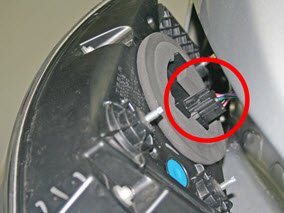
- Working from outside the vehicle, rotate the taillight towards
the front of the vehicle expose the taillight harness. Disconnect
this harness and remove the taillight.
Installation procedure is the reverse of removal, except for the following:
- Insert a 1 mm feeler gauge between the body and the base of
the tail light. While holding the feeler gauge in place, tighten
the nuts in the order shown (torque 3.5 Nm).


READ NEXT:
 Lamp - Brake - High Mounted (Remove and Replace)
Removal
Remove liftgate glazing (refer to procedure)
Position liftgate glazing on suitable glazing stand.
Note installed position of Central High Mounted Stop Lamp (CHMSL).
Us
Light - License Plate (Remove and Replace)
Removal
Remove the screws (x5) that secure the rear applique bracket to
the tailgate.
Remove the rear applique bracket.
Light - Fog/Reverse - Rear - LH (Remove and Replace)
Removal
Remove the liftgate applique (refer to procedure).
Remove the tailgate lower finisher (refer to procedure).
Release the watershield for access to the fog/reverse lamp.
SEE MORE:
Antenna - GSM - LH (Remove and Replace)
Note: The GSM antenna is a component within the door
mirror assembly. If the GSM antenna develops a fault, the whole
mirror assembly must be replaced.
Removal
Remove the door mirror assembly (refer to procedure).
Remove the door mirror
Back Rest Assembly - 2nd Row - Executive (Remove and Replace)
Removal
Remove the LH and RH lower seat cushions (refer to procedure).
On each side of the vehicle, remove the screw that secures the
closeout panel to the seat frame (torque 5 Nm). Remove the panel
from the vehicle.
© 2019-2026 Copyright www.tesms.org
