Tesla Model S: Tail Light Assembly (Non-Motorized Charge Port) - LH (Remove and Replace)
Tesla Model S (2012-2026) Service Manual / Electrical / Tail Light Assembly (Non-Motorized Charge Port) - LH (Remove and Replace)
Special tool required for this procedure:
| Supplier | Part Number | Description |
| Tesla | 1054190-00-A | Feeler Gauges |
- Open the charge port.
- Remove the rear trunk side trim (refer to procedure).
- Remove the nuts (x3) that secure the tail light assembly to the
quarter panel (torque 2.5 Nm).
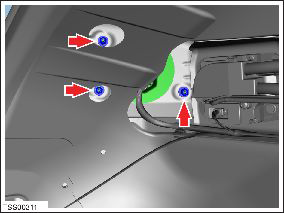
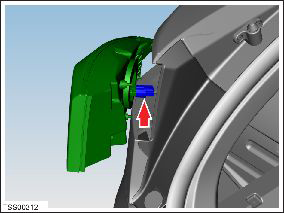
- Disconnect the harness and remove the tail light assembly.
Installation procedure is the reverse of removal, except for the following:
Insert a 1 mm feeler gauge between the body and the base of the tail light. While holding the feeler gauge in place, tighten the nuts in the order shown (torque 3.5 Nm).


READ NEXT:
 Tail Light Assembly (Motorized Charge Port) - LH (Remove and Replace)
Special tool required for this procedure:
Supplier
Part Number
Description
Tesla
1054190-0
Lamp - Brake - High Mounted (Remove and Replace)
Removal
Remove liftgate glazing (refer to procedure)
Position liftgate glazing on suitable glazing stand.
Note installed position of Central High Mounted Stop Lamp (CHMSL).
Us
Light - License Plate (Remove and Replace)
Removal
Remove the screws (x5) that secure the rear applique bracket to
the tailgate.
Remove the rear applique bracket.
SEE MORE:
Pipe - High Pressure - Charge Port (Dual Motor) (Remove and Replace)
Warning: If the 12V power supply is disconnected, do
not attempt to open any doors with door glass in closed position.
Failure to follow this instruction could result in door glass
shatter.
Note: Before disconnecting the 12V power supply,
ensure that the driver's door window
Sensor - Parking Distance - Front - Each (Remove and Replace)
Removal
Remove the front fascia assembly (refer to procedure).
Set the fascia assembly on a flat, clean surface.
Disconnect the parking distance sensor connector.
Carefully release the parking di
© 2019-2026 Copyright www.tesms.org
